
Text and pictures © 1990-2026 Guillaume Dargaud
Last updated on 2025/10/27
"As far as I knew, he had never taken a photograph before, and the summit of Everest was hardly the place to show him how." — Edmund Hillary, referring to the Sherpa Tenzing Norgay.
That's an email question I often get. So, here are a few tricks for taking pictures while trying to breathe high up in the mountains, while belaying ("yup, go ahead do the crux move, I'm holding you !") or while hanging by your fingertips ("Heah, great angleeeEEEeee <Splat> !").
Obviously this information is only meant as a starter, there are plenty of website with great photo advice, or better books, or even better a subscription to Chasseur d'Images.
![[ToclaFace.jpg]
A picture taken by a friend showing me nearing the summit of Toclaraju, Peru. I'm visible as little more than a black fleck, even on the highest resolution scan.](../Climbing/Peru/ToclaFace.jpg)
Left: A picture taken by a friend showing me nearing the summit of Toclaraju, Peru. I'm visible as little more than a black fleck, even on the highest resolution scan.
There are different ways to do climbing photography, depending on where you are climbing and what you want to show. For instance, take mountain climbing: basically you take pictures while you are climbing. If you take only a close up of your partner, it's not too interesting in itself so you need to include some background to show how high up you are, what kind of climbing your are doing... So it's actually closer to scenic photography, except that you want to convey that you are in the picture (or the back of it), living an adventure and not just taking a picture of some mountain from the road. It's enough to get the camera out every once in a while and take a shot and anyway you can't move away to show the general view. Back home you can sort out the 3 basic kinds of pictures that come out of such a trip: climber close up, pure landscape and climber(s) included in scenery. It's quite important to vary those 3 types of shots if you are doing the slide show of an expedition for instance: no one wants to see 100 pictures of mountains in succession, even if they are all perfect.
On the other hand, take rock climbing photography: you want to show the difficulty, the movement, the strength of the climber, but you are not particularly interested in the rock itself. For this you need to act more like a real photographer: you have a subject and need to show it in a certain way, you are not part of it, it's his climb not yours (even if you did climb it just before). You need to be a better photographer for this than for mountain climbing photography; it's sometimes more like a studio: making sure the light is right (climbers always have their face in the dark against the rock), finding the proper angle (left for this move, right for the next one maybe, from the top with the head up, from the bottom with the legs spread out), managing facial expressions, etc...
So here's a list of things I have to say about climbing photography, having started both activities at the same time 13 years ago.
![[ElCapMoon.jpg]
El Capitan at night, 1 hour exposure, 50mm/f1.8 at 5.6. The headlamps of the climbers leave a trail of light. It takes some power of will to take such a picture: hike up to the proper spot in the evening with the gear and a sleeping bag, set it up and take a bunch of picture as the night gets darker, increasing the exposure each time: 30s, 1 minute, 3, 10, 30, 1 hour, 3 hours... The non-reciprocity of films in dark conditions makes it so that doubling the exposure does not double the amount of light on the film. Bring an alarm clock.](../Climbing/Yosemite/ElCapMoon.jpg)
Well, there are entire magazines devoted to helping you choose a camera. I will only point out a few things: the ideal climbing camera should be light, sturdy, weather-resistant, with very sharp optical quality for landscapes, a flash for those early morning starts, long exposure capability for those easygoing camping pictures on a tripod, over/underexposure capabilities for snow or dark rock, easy to manipulate with gloves, very resistant to the cold, last a long time on its set of batteries, and so much more...
Right: El Capitan at night, 1 hour exposure, 50mm/f1.8 at 5.6. The headlamps of the climbers leave a trail of light. It takes some power of will to take such a picture: hike up to the proper spot in the evening with the gear and a sleeping bag, set it up and take a bunch of picture as the night gets darker, increasing the exposure each time: 30s, 1 minute, 3, 10, 30, 1 hour, 3 hours... The non-reciprocity of films in dark conditions makes it so that doubling the exposure does not double the amount of light on the film. Bring an alarm clock.
It's a religious war and although I'd like to avoid taking sides, I have to say that the idea that an old fashion manual camera is more reliable than a new electronic one is actually quite wrong:
The one true advantage manual cameras have is for long exposures: there's no time limit on it. All recent cameras use an electronic shutter that will drain the batteries in a few hours when using the B or T-pause.
![[FrenchDirectRock.jpg]
A picture taken with the camera programmed to take one shot every 10 minutes while I was soloing my hardest route ever in Peru ! 20mm lens.](../Climbing/Peru/FrenchDirectRock.jpg)
Right: A picture taken with the camera programmed to take one shot every 10 minutes while I was soloing my hardest route ever in Peru ! 20mm lens.
Religious war. Canons are light (plastic) which is important if you need to carry them up mountains. On the other hand most Nikons (used to) accept normal AA batteries, which you can replace by  Energizer Lithium for very cold weather conditions, which is even more important. None of the people who had Canons in Antarctica could keep them running outside for more than an hour without an external power supply. Personally I've used Nikons for the last 15 years and they have never failed from the cold, and I've been at -50°C (-58°F)... strike that as of september 2005: -78.6°C (-110°F, not even counting the wind chill). The point is, buy a camera that accept standard AA batteries, external power supplies are very expensive and a major pain to use. And you can find AA batteries in the most remote places of Butphukistan.
BTW, I have nothing against Minolta or Pentax, I just don't know them well and their lens offerings are way more expensive than Nikon/Canon/Sigma for specialty lenses (think 20mm or f2.8 zooms)
For mountain climbing, it is much better to have a small camera always handy in your breast pocket than a top of the line but big camera that you have to keep inside your backpack. When you want to take a pic and you are tired or in a hurry (or as usual both together), just think about having to stop the party, remove you pack (at the risk of dropping it), open it up (at the risk of dropping things from it), take the camera out, take the pic and finally put everything back inside...
There are few small cameras that fit the mountain climbers' main requirements of being rugged with a good wide angle lens. For film cameras, the Minolta TC-1, the Nikon Ti28 and the cheaper (and also better designed) Ricoh GR1 all have a 28mm lens. Avoid like the plague any P&S with a zoom, they have the worst lenses in existence and sharpness is essential for landscape photography.
If you want to go super light, avoid even more 110mm format (so-called 'spy cameras'), but why not a Minox GT-E or GT-S ? They have excellent optics and are famous for being the lightest 35mm manual cameras ever made. The problem is that they are also very fragile (thin plastic), quite sensitive to humidity and impossible to operate with gloves (or big fingers !).
So the best solution is probably to have a big SLR in the pack and a tiny compact in the pocket.
Let's admit it, when climbing, there's no way you can focus manually. Either you have only one hand available while the other belays or holds you against gravity, or your are wearing thick gloves, or you don't have time, or you have sunglasses on or you are holding the camera at arm's length to point over the ledge... So is it a clear victory for autofocus ? Not quite. Most of the time you will focus on infinity anyway, so a manual camera pre-focused on infinity (or better, on the hyperfocal) will do just fine. I wish there was a way to get cameras to focus automatically on their hyperfocal distance (depending on the aperture), but I don't know of a single model that does so: you either have to look at your lens marking (not always present) or compute it yourself. Many compact cameras have a 'snap' mode for quick focus on a standard distance, sometimes within the hyperfocal range.
Up until about 2005 digital photography didn't have much to offer for the discerning climbing photographer. Good digital SLR bodies are still quite expensive as of 2009, they fear rain, they are heavy, you can't read their tiny screens in the sun, quality is not up to a good lens with a 100 iso film... But other factors have been getting better: battery drain is now in check, image storage is now cheaper than film+processing, trigger delay is all but gone, and wide angle lenses are available (although far from cheaply)...
The fact that you can review your pictures immediately is an advantage when the ligh conditions are difficult, which is often the case with the high contrast found in the mountains... Personally I waited till 2007 to go digital. I waited up for a 24x36mm Nikon digital sensor, and when I was fed up I finally decided on the Fuji S5 pro for its superior ability to deal with high dynamic range without burning the highlights. And 3 months later Nikon announced its full sensor D3 ! No, I'm not bitter, I really do like the S5, I wouldn't have been able to afford the D3 anyway and Nikon says you have to use their new 'optimized for the D3' FX lens range anyway. Fat chance !
Beforehand I'd been playing for a year with the Ricoh GRd which is a digital 'version' of the GR1, but although it's a greatly convenient camera, I'm not too satisfied of those burnt out highlights. Another solution which I haven't tested could be to get a compact Fujifilm camera with a SuperCCD SR sensor (but not HR), as you'd get the same ability to withstand high contrasts as the S5. If you can find one with a wide angle you may end up with a perfect camera, but apparently they put cheap-ass sensors on their cheap cameras. The only one I could find which may fit the bill is the cheap Fujifilm F480, but I haven't tested it, so beware. Come on Fuji, put an APS-size SuperCCD SR into a GRd body (even if you need a crowbar to fit it in) and I'll sign the check in blood.
One of the main issue of climbing photography is that the landscapes are wide, so it only seems logical to use wide angles, and for the longest time wide angles were unavailable on digital cameras (both SLRs or compacts). But besides the fact that wide angles are now availables on SLRs and some compacts have lenses equivalent to the old 28mm, one capability of digital cameras makes this less of a requirement: the ability to take several images and combine them into a panorama, not necessarily horizontal. In a few shutter release and 5 minutes of software use such as PTgui, you can make a 180° panorama, a 100 megapixels image worthy of a chamber camera or wide perspective normally unatainable without a fisheye lens. I loved my GR21, but I finally sold it in late 2007.
But don't forget that the main thing that you lose in the move to digital is the excellent $200 slide projector showing a better resolution and brighter slide than anything you could ever dream of (and much less afford) in digital. Add some friends and lots of beer and you are set for a full re-enactment of your exploits on El Cap.
| Cons of digital photography: | Pros of digital photography: |
|---|---|
|
|
So yes, as of 2007 I've finally sold out and gone digital, but I'm not entirely satisfied of the change.
| 2009 Models | Price | Lens | Aperture | Mpix | Weight | Out | Specific |
|---|---|---|---|---|---|---|---|
| Fuji F200 EXR | 340 | 28-140 | 3.3-5.1 | 12 | 175 | 2009-01 | Extended dynamics. Sucky menus. |
| Leica D-Lux 4 | 800 | 24-60 | 2.0-2.8 | 10 | 228 | 2008-09 | Expensive and basically identical to the LX3 below |
| Panasonic LX3 | 430 | 24-60 | 2.0-2.8 | 10 | 265 | 2008-07 | 60s, RAW, HD video, DMW-LW46 46mm 0.75x (18mm) Wide Angle Conversion Lens available |
| 280 | 25-125 | 2.8-5.9 | 12 | 128 | 2008-07 | 60s, face recog, RAW |
| Ricoh GX200 | 350 | 24-72 | 2.5-4.4 | 12 | 208 | 2008-06 | |
| Ricoh CX1 | 300 | 28-200 | 3.3-5.2 | 9 | 180 | 2009-02 | Extended dynamic range, 120fps. Too bad it doesn't go down to 24mm and other functions are subpar |
| Samsung NV24 HD | 220 | 24-86 | 2.8-5.6 | 10 | 146 | 2008-01 | HD video |
| Samsung WB550 (HZ15W) | 300 | 24-240 | 3.0-5.8 | 12 | 219 | 2009-02 | image processing bleh |
| Samsung WB1000 (TL320) | 270 | 24-120 | 2.8-5.6 | 12 | 2009-02 | image processing bleh |
![[Base_VPano.jpg]
A vertical panorama assembled from two separate pictures taken on top of one another. Use of the flash to lower the contrast between the sunny area and the dark foreground. A sleepy Jenny looking up to the Scenic Cruise after only two pitches (12 to go).](../Climbing/BlackCanyon/Base_VPano.jpg)
Left: A vertical panorama assembled from two separate pictures taken on top of one another. Use of the flash to lower the contrast between the sunny area and the dark foreground. A sleepy Jenny looking up to the Scenic Cruise after only two pitches (12 to go).
Thinking about Ansel Adams, hey ? Well, you might be disappointed... I don't want to disprove your talent, but Adams wasn't using a camera but a chamber with huge negatives. It helped a lot in displaying a smooth grain with things like rock or showing the most minute details and shade variation. Even the latest B&W films like the Fuji Acros cannot match that in tiny 24x36. Adams also had tricks like putting silver dust on his paper during the enlargement process, something that is still hard to replicate with PhotoShop. My first tries at B&W climbing photography were not impressive; but then recently I tried again, and if you focus more on the climber than on the climbing scene itself, it sometimes gives good results. Here's a B&W portfolio of a climb in the Black Canyon and more explanations here, including a way to make Ansel Adams pics !
A lens choice summary in 10 lines ? That's impossible but let's just say that for scenic photography you want two attributes in your lens: wide angle (and here I mean something below 24mm, but not a fish-eye) and the utmost sharpness.
Zooms are a lot more convenient, particularly when climbing, but fixed lenses have a better absolute resolution, something required for landscape. Zooms also exhibit more flare (internal reflections due to the presence of the sun near the corners of the picture). The newer wide angle zooms like 28-something, 24-something or even now 20-something seem damn convenient as a unique lens but there's a price to pay in terms of weight, flare, loss of sharpness, vignetting, etc...
When I travel light I usually take only a 20mm/f2.8 and a 28-70/f2.8 or a 28-105/f2.8-3.5. A tele lens might be useful every once in a while to give a 'fly on the wall' appearance to climbers high up, but they don't make 'in the action' pictures. Overall telephoto lenses are not very interesting for climbing, except for taking portraits when bored at base camp. The focal length does determine the relative perspective between foreground and background; only a wide angle lens can make a foreground element like a climber stand out dramatically in relation to its background.
Recent wide angle zooms like the Nikon 24-85 2.8/4 IF AF-DW or the Sigma 24-70 3.5/5.6 AF Aspherical would probably make great single lenses for climbing photography, provided they don't flare too much when the sun is in the frame, something I hate and that will also ruin assembled panoramas. If interested, you will find more information about what kind of equipment I use (or have used) on a separate page.
A lens shade is quite useful to avoid the flare caused by the sun, but is often impossibly inconvenient to carry (or affix one handed while belaying). Some lens makers like Sigma make lenses with an integrated shade that you only need to reverse on the lens, or even on a few models like the 28-70mm/f2.8-4 AFD where the shade comes up automatically when you zoom. I must confess that if the shade is not integrated in the lens, I never carry it around and would rather place my other hand (if available) between lens and sun.
The golden rule of photography says to put more money in your lenses than in the camera itself. So Pro lenses or normal lenses ? Even if you have the money, the choice may not be so easy. A pro lens, like a 28-70/2.8 weight about 4 times more than its f4.5 counterpart and is also much bulkier. Remember, there's no point in buying an expensive lens if you are going to leave it at home or at the base of the cliff... And the extra stops of light might not be such a big deal if your pictures are all on bright days climbing in the sun.
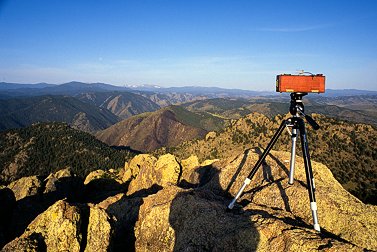
Right: It doesn't take the latest model camera to make landscape photography. Here's Chris Kidd's homemade camera, perfect for doing large panoramic pictures on 60x170mm films. Some wood, a lens, a few simple cranks, 15 hours of work and that's all it takes... (Photo C. Kidd)
Bah ! With some rare exceptions, watching people climb on a video is about as interesting as watching paint dry.
Climbers have the chance that several very specialized pro cameras work great for climbing photography (if they are rich enough). First if you combine wide angle and Point&Shoot you get the Ricoh GR21, the only P&S with a 21mm, thus the ultimate wet dream camera for the light mountain climbing photographer. I dreamed about it for 10 years and then saved for 2 years when it was first announced in 1999. Only 4000 were ever produced. I've used it extensively and loved its convenience and sharpness.
Mountains are big, and you are small at the base, so the perspective sometimes end up not being quite up to what you thought. A similar problem faced by Architecture photographers, which they solve by using shift / tilt lenses. This way you can keep the plane of the film vertical, parallel to the cliff, while having the lens focus on the middle of it, high up. Those lenses, like the Arsat 2.8/35 Shift Lens or the various Nikon PC lenses are expensive and old-fashioned (no AF, tripod required...). You can do computer post-processing with similar results nowadays.
Mountain climbing photography goes hand in hand with landscape photography, so a panoramic camera seems like a good idea. Or does it ? 99% of the cameras (both compacts and reflex) that have a 'panoramic mode' actually do it by hiding the upper and lower third of the image. That's it, and it applies both to film and digital cameras. You can do the same thing by making an enlargement of your pictures and cutting off the top and bottom with a pair of scissors or a photoshop crop ! The quality goes down since you have less surface area on the film/sensor. The only advantage is that the lab usually makes the print directly on panoramic paper; with a normal camera you need to order an enlargement and then cut it off. Very few cameras, like the old Ricoh R1 have a bi-focal lens that can give a wider field of view when in pano mode (24mm vs. 30mm).
And don't get me started on the stupid APS format, a format designed by marketers to enable them to suck more money from ignorant customers: cameras more expensive, fewer functions, hardly any of the promised advanced functions ever implemented, smaller film area (an enormous drawback for landscape photography where you want the highest resolution possible), prints that cost twice as much, NO SLIDES, no B&W... 10 years after its introduction, this format is mostly gone.
There are a few real panoramic cameras, real meaning that they take the picture on the whole height of the film (24mm) and wider laterally than the usual 36mm. This is achieved for instance by placing a 35mm film inside a 6x6 camera, allowing for 24x60mm shots. Or special cameras like the Hasselblad X-pan on 35mm or the gigantic Fuji GX617 on 60x170mm film ! And don't get me started on chambers, the holy grail of landscape photography, which you need a Caterpillar to carry.
And ever dreamt of taking a picture of all the mountains around you in one shot ? Some rotating cameras like the old Russian Horizon 360 or some new digital cameras can do it by rotating during the shot. The price is in proportion to the rarity of the camera, and obviously you need to be able to do something with the picture later, as it's not easy to find a lab that can make prints out of a 24x400mm negative, and it's not easy to scan either. To give you an idea, that's only about 3 pictures per roll of 36...
The cheap solution, although there is some additional work involved, is to take a series of normal shots, scan them and use a stitching program like my old PanoWarp freeware or a more powerful and expensive program to put them all together. It weight 0, cost close to 0 and with some careful work gives amazing panoramas that you can print easily with a photo printer that accepts roll paper. As of 2007 it takes no more than 5 minutes of work to produce and excellent image.
Note about 360° pictures: they are usually not very interesting when taken from mountain summits: there's no foreground, the valley is far below, barely visible because of the contrast, and the summit itself is not visible because... you are standing on it ! Take such panoramas from mountain passes, valleys, or lower mountains (Mt Frances below Denali comes to mind).
![[SunShort.jpg]
Multiple exposure showing the shortest day of the year in Antarctica. One shot every 7 minutes on the same slide, every shot being underexposed by -3 stops. You either need lots of patience or an advanced programmable databack.](../Antarctica/Sky/SunShort.jpg)
Left: Multiple exposure showing the shortest day of the year in Antarctica. One shot every 7 minutes on the same slide, every shot being underexposed by -3 stops. You either need lots of patience or an advanced programmable databack.
Get a good pouch against rain and dust. Zipper or velcro/clip ? The velcro + clip system is very fast for when you need to get a quick shot while belaying. The zipper is essential if it's dusty or rainy but it needs two hands to operate. The solution is to get a bag with both and use whichever suits you.
Dust is not only annoying in the viewfinder, it can scrape films, leave spots on digital sensors and damage the internal mechanics of any camera, so get it cleaned professionally every once in a while after climbing those desert towers... Don't ever use an airjet spray on the inside: you can break the curtain and you will only send the dust flying even deeper inside the camera. If you come back from a climbing trip and all your films show a scrape at the same height, you may try to save them by dipping them in Tetenal Repolisan; I've used it and it works great if the scrape is not on the emulsion side.
When I want to go really light and don't want to bother with a bulky pouch, I wrap my big lenses in a thick sock and my camera in a T-shirt in the pack. Makes for a smelly lens and a sweaty camera on long hikes...
Tape all you can of your camera and lenses with gaffer tape (unlike duct tape it removes without leaving marks), and leave it there until you resell the camera. It protects against banging on rocks, scrapes and more importantly thieves. You have no idea how attractive a big Nikon label can be to thieves; on the other hand, a tape-covered camera is not so sexy. In the same vein, if I could just find a TopCon sticker to put on top...
Carry a plastic bag in case it rains. Yeah, a supermarket bag will do fine.
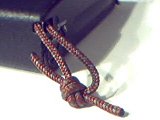
Attach a small sling to the camera (right) so you can clip it directly to your harness, belay or clumsy partner... When I'm belaying and want to get ready to take pictures, I get the camera out of the pouch, turn it on and clip it to a shoulder sling. I just let it hang, being careful not to hit it against the rock, and it takes me only a second to take a picture from this position.
![[CookSummit_NoCor.jpg]
A picture of the summit of Mt Cook (New Zealand) without either UV filter or color cast correction.](../Climbing/NZ/CookSummit_NoCor.jpg)
![[CookSummit.jpg]
The same picture with either a UV filter, a color balance (on digital camera) or a post-scan color cast correction. Notice that here the effect is a bit too much, sunny snow has become yellow. Shadows should always stay a bit blueish.](../Climbing/NZ/CookSummit.jpg)
With film cameras, use a filter on your front lens. A UV filter (left: without, right: with UV filter), SkyLight or polarizing filter will do fine (see below). Once a chunk of ice hit my 20mm dead on while I was taking a picture of my partner leading some steep ice. The UV filter was shattered but the $1000 lens didn't have a scratch ! Except for the protection, UV filters are useless on digital cameras when the [Auto White Balance] performs the same function and much more.
Left: A picture of the summit of Mt Cook (New Zealand) without either UV filter or color cast correction.
Right: The same picture with either a UV filter, a color balance (on digital camera) or a post-scan color cast correction. Notice that here the effect is a bit too much, sunny snow has become yellow. Shadows should always stay a bit blueish.
Ever lost a lens cap ? Annoying, heh ! A little trick is to put a little piece of string between the lens and the cap with two drops of glue. The problem is that now it will flap in the wind or hang in your view while you aim down. Nah, I'd rather loose one every once in a while and replace it with a brand-less nondescript one (having 'Nikon' written in big is like having 'Steal me' written).
Get insurance coverage, but only if the camera is very recent, and be sure to read the fine print (just remember how many life and medical insurances exclude climbing in the fine prints). Just remember that insurance companies are in this business to make money, so sure, they will insure your camera if you ask them, but be aware of things like depreciation: you certainly don't want to insure that brand new digital body that in 2 years only will be worth about $50 on the used market... It's up to you.
![[GaetaPiton.jpg]
Just to show that little 'details' should be photographed as well. You think a scary old rusty piton like that is not important ? Climbing in Gaeta, on the coast between Rome and Napoli.](Best/GaetaPiton.jpg)
Left: Just to show that little 'details' should be photographed as well. You think a scary old rusty piton like that is not important ? Climbing in Gaeta, on the coast between Rome and Napoli.
If you invested your life savings in a camera, you might consider not climbing with it at all... When I got stuck in a squeeze chimney on Castleton Tower way above my last protection, I briefly had the thought of throwing down the camera bag attached to my harness, with the expensive F100 in it ! Your camera will get rained on, banged up and dusty even if you are careful. My F801s had 2 trips for cleanup / minor repairs and my five Ricohs each had a trip to the repair shop ! In the most extreme conditions, take a waterproof disposable camera, averages pictures are always better than no pictures and a $1000 repair bill...
And if the climb is a once in a lifetime opportunity (aren't all climbs like that ?), take more than one camera. On Cho-Oyu I had a big Nikon F100 and a small Ricoh Gr1. I used the Ricoh exclusively above Camp 1. Only problem is that my sister had fallen down the stairs with it (while 8 months pregnant, the morning of my wedding [I'm not making this up]) and broken it. I got it back from the repair store a few days before leaving but, unbeknown to me, the shutter wasn't working. So I came back with plenty of empty rolls of slide. It's frustrating enough to break a camera, but to loose hundreds of unique pictures as well... If it had been my only camera, shudder... If you break your camera at the beginning of a trip in a far country, or if it gets stolen, there won't be any pictures without a backup camera which you most likely won't be able to purchase there.
I met a guy who climbed the Nose of El Capitan many years ago. He had a small all metal Rollei in a leather bag and dropped it almost at the top of the route; they were particularly bummed since they had all the pics of the ascent still inside. They searched the base for a while and found it, crushed but still inside the leather bag. The joke was that they brought it all smashed up to the camera store and asked for a repair... But in the darkroom they did manage to get the film out. I saw his slides, they were a bit scratched up but otherwise pretty good.
If you are afraid of leading long rock climbing routes with a camera attached to your harness, here's a little trick: leave the camera with your partner at the belay and lead the pitch. Your second can then climb the route with much less risk for the camera (no bouncing lead fall possible here). About 2/3rd of the way up, lower a loop of rope to him and get him to attach the pouch to the rope. Pull it up and start shooting. Obviously you need a good pouch that can stand a bit of scraping and bouncing against the rock, and it's easier to do if the face is vertical, the route straight up, there's no wind, you are not in too much of a hurry and you partner is willing to carry the extra load (this also applies to windbreakers and sandwiches).
When you are getting desperate in that flared overhanging offwidth, you can always use your enormous TopCon with its 20-600mm lens as a chockstone for protection. Just kidding to see if you are still with me here.
Against third world country street thieves who sometimes use razor blades to cut off your shoulder strap and run off with your camera, here's a little trick: double up the strap with a metal wire threaded in. And put tape over too attractive 'Nikon' or 'Canon' symbols.
And if you do break your lens or camera, it doesn't hurt to have a go at repairing it yourself before sending it for repair. With only a set of tiny screwdrivers, some glue and some patience I've managed to repair 3 of my lenses, one of which had a disloged diaphragm, the other a locked zoom barrel, and the 3rd one had been cleanly broken in half in a fall... Hmmm, no, that wasn't a climbing fall, I tripped on my shoelaces in the parking lot...
![[PenguinPhoto.jpg]
A penguin taking a pause for a photographer.](../Antarctica/Life/PenguinPhoto.jpg)
Right: A penguin taking a pause for a photographer.
As for the cold, I always use Energizer's Hi-Energy Lithium (LithEon, ref L91 or X92) AA batteries. Even at -50°C they work perfectly (any other kind dies pitifully, especially the kind of small lithium batteries they put in most compacts nowadays). They even make other batteries with that technology, like AAA or the CR2 for the Ricoh. But in the unlikely event that you have to withstand temperatures below even that, know that no battery in the world can help you, unless you want to lug a car battery around. Directly linked to this battery issue is the fact that digital cameras die very fast in the cold as they drain more power. To give you an idea, at -70°C my F100 would last about 30 minutes while a more recent D70 wouldn't last more than 3 or 4 minutes.
So in summary it's a very good idea to carry a spare set of batteries in a warm pocket. If you need to warm up a battery fast, put it under you armpit, directly against the skin.
I don't recommend carrying the camera under your clothes too close to the body since the sweat will fog it when you put it back from outside (not only the lens, but also the film inside, leaving grey spots on the pics), but sometimes it's the only solution.
![[FrozenFilm.jpg]
The green stripes are where the gelatin on the film broke during advancement. This film later snapped completely while shooting for 7 hours at -70°C and I had to retrieve it in the darkroom.](FrozenFilm.jpg)
In extreme cold conditions the film may freeze and break in the camera, and this has happened once to me after having left the camera in long exposure at -70°C. Solutions involve wrapping the camera in insulating foil and dropping a couple heat packs underneath or bringing the camera back inside to let it warm up before advancing the film. Note that this is not an option with motorized cameras. For this reason for my winterover in Dome C I bought an old Nikon EM for 50$ on eBay. I would just put it on a tripod outside, trigger it with a cable release and let it for a bunch of hours to do star rotations, shooting stars and satellite overpasses, then bring it back inside and let it warm before the next shoot. Also having a manual film advance lets you wind the film carefully.
Right: The green stripes are where the gelatin on the film broke during advancement. This film later snapped completely while shooting for 7 hours at -70°C and I had to retrieve it in the darkroom.
Another strange issue I've had to deal with in extreme cold (think well below -50°C) is exploding batteries. Three times I've had batteries become so hot in either my GPS or my camera that they scorched the skin against the pocket where they were. They didn't really explode but when I pulled them out they were all bloated. So again, a manual camera with the battery removed will work just fine, you just have to guess the appropriate exposure.
About very cold weather you'll still hear this old story that you need to have the grease removed from the camera as it can harden and lock the mechanisms... Well for several decades there haven't been any grease inside cameras, only very liquid synthetic lubricants that don't harden with the cold, so rest easy.
Also practice operating your camera at home while wearing big gloves. There will be times when you don't want to remove them to fiddle with little button settings or tiny wheels. In other words, if there are functions that you cannot use with gloves, learn to do without. For instance I personally like to use the camera in Aperture Priority mode and turn the aperture wheel manually; but it's impossible to do with gloves, so on cold days I just set the camera to Program mode.
And while we are at it, if you have a tiny P&S, be careful not to put your glove in front of the lens... Yeah, I know it sounds like stupidly obvious advice but you won't believe how many mountain climbing pictures I've seen with a fuzzy red blob in the corner.
![[20050902_RecordTemp.jpg]
The Concordia 2005 winterover team united during the record low temperature of the winter: -78.6°C. Camera on a tripod which didn't stay outside for long (neither did we with removed face masks). (Photo Karim Agabi)](../Antarctica/DC2005/20050902_RecordTemp.jpg)
Left: The Concordia 2005 winterover team united during the record low temperature of the winter: -78.6°C. Camera on a tripod which didn't stay outside for long (neither did we with removed face masks). (Photo Karim Agabi)
![[SuperCrackJasonSequence.jpg]
Example of digital manipulation put to good use: sequence of pictures of Jason on SuperCrack in Utah. Put the camera on a tripod, take a bunch of shots, scan them all then use the clone brush of your graphic program to copy the different climbers from each separate shot.](../Climbing/Utah/SuperCrackJasonSequence.jpg)
![[ShelfRoad2_5.12.jpg]
The effect of light coming parallel to the rock, enhancing every tiny edge. That's me on a 5.11d at Shelf Road, Colorado.](../Climbing/Colorado/ShelfRoad2_5.12.jpg)
"My advice for climbers or photographers is to really tune into your own passions and not just what other people are doing or aren't doing. Figure out what works for you, what turns you on, what gives you the greatest amount of energy and feeling of satisfaction." — Galen Rowell.
Use slide film; as you can't get as much detail with negatives, except when comparing high sensitivities which you'll never use for climbing anyway; and slide shows with friends and a good glass/mug/bucket of wine can be so fun... Same goes for digital, use the lowest sensitivity of your camera (usually 100iso, 50 or 200).
I used to use mostly Fujichrome Velvia 50 asa slide film. 50 asa is not much, but when you are on snow or with a wide aperture lens you get great results. Colors are awesome and grain is virtually non existent. Personally I like it better than even Kodachrome 25 ! The bluish hue on some of my pictures is due to the altitude. The Velvia, when underexposed, will give you green snow. Yuk !
In 2000, the new Fujichrome Provia 100F made me change my mind. It has the same grain as the Velvia, colors almost as saturated and it gives you more flexibility in the exposure. I sometimes take B&W, in which case I use Fuji Acros 100 (after a decade with the Kodak T-Max 100) and an orange-red or greenish filter.
If you have a digital camera and you find the hues on the image to be somewhat off, there are two things to do: calibrate your screen and take RAW files which you can later process in software to extract the proper color balance.
Left: The effect of light coming parallel to the rock, enhancing every tiny edge. That's me on a 5.11d at Shelf Road, Colorado.
Right: Example of digital manipulation put to good use: sequence of pictures of Jason on SuperCrack in Utah. Put the camera on a tripod, take a bunch of shots, scan them all then use the clone brush of your graphic program to copy the different climbers from each separate shot.
Mostly, when in the mountains, the trade secret for the best landscapes is to take the pictures at the right time: around sunset and sunrise you have a 10 minutes window when the light is great (less at the equator, a lot more near the poles).
Avoid taking pictures in the middle of the day, except if you can have the light of the sun parallel to a cliff, thus casting long shadows off tiny outcrops and highlighting details. Look at the picture on the right to have an idea of what I mean by that: see how the skin of the climber (me) is burned out by too much direct light, while the tiniest holds on the rock are visible.
Watch for cloud movements. Wait while they are in front of the sun if you expect them to go away.
As you don't want to haul tons of accessories with you up a climb, the two main filters used for climbing photography are the UV filter and the polarizing filter. The first one stops the UV from getting through the lens. It doesn't make a huge difference at sea level, but at altitude where the amount of UV is quite high it does reduce the blueish hue of the pictures (note that if you have a digital camera you can emulate it by using the white balance function, and if you have a scanner you can use the color balance filters to remove it afterwards). Besides that, its true use is to protect the front lens against shocks, falling ice, bouncing against rocks and scraping in the pack in case you loose your lens cap. When selecting a UV filter in a store, open all the various models' packages and place them on a white sheet of paper; select the least colored one. Avoid skylight filters which give a pinkish hue to the images.
The polarizing filters come in two varieties, circular required for AF cameras and linear for manual or compact cameras. The effect is the same. This filter makes darker skies on pictures when used properly, it increases colour saturation and it brings out clouds and foliage against the sky. Its drawbacks are: it eats up about 2 stops of light, you need to rotate it each time for best results, it's a pain to use on lenses with a rotating front lens and it gives weird results on wide angles (half the sky clear, the other half dark). If the atmosphere is loaded with humidity, there's not much effect, but at very high altitude it can give you a not very natural looking ink-black sky that makes it look like you are climbing in outer space... It's possible to use polarizing filters on some compact camera, but you have to remove it each time to figure out the angle of rotation by sight, and you must overexpose by two stops (most compacts don't let you do that though).
Plenty of people will say "over-expose on snow", "use the spot meter", "meter your hand", "Use the 1/16 rule" and other tricks, but the truth is, with modern SLRs you can trust the matrix metering in 99% of the situations, even on snow. You have a doubt, a violently backlit subject or a potential exceptional shot ? Take 2 additional shots, bracketing lighter and darker by one stop. Film is cheap compared to having to hike in again to take the same shot, don't you think ?
The only time I consistently over-expose are on north-facing ice climbs, otherwise the ice turns out too dark. And also sometimes on rock climbing in the shade, particularly if the background is lower and in the sun, it will trick the meter.
![[OurayIceClimbing.jpg]
Notice how the flash brightens up the ice, particularly the falling chunks which would be invisible otherwise. That's Jenny ice climbing in the Ouray ice park, Colorado.](../Climbing/Colorado/OurayIceClimbing.jpg)
Left: Notice how the flash brightens up the ice, particularly the falling chunks which would be invisible otherwise. That's Jenny ice climbing in the Ouray ice park, Colorado.
When there is a lot of contrast, think about using a flash. It's not useful if everything is in the shade (it will only make the foreground appear too bright and the background too dark), but there are 2 places where it's quite good: rock climbing and ice climbing. Rock climbers always have their face turned towards the rock, cutting off the light. Use the flash, associated with the rear-curtain, to light it up a bit. Only problem is that, because of the distances involved, you need a powerful flash for that, and it's not very convenient to carry an external flash up a mountain. For ice climbing the context is different since usually the climb happens on a north face and there's no sun; even a small flash from a compact camera will put reflections and sparkles in the ice. Just remember that most compacts' flashes won't work further than 2~3 meters. Notice the flash enhancing the falling ice on the picture on the right ?
Yes, a tripod is always useful, think about night pictures, star rotations, climbing sequences, long stands waiting for that 9a move, self portraits... Three choices only for climbers:
![[Golden.jpg]
Jenny and Lisa merging vertical perspective while climbing in Golden, Colorado. 20mm.](../Climbing/Colorado/Golden.jpg)
Right: Jenny and Lisa merging vertical perspective while climbing in Golden, Colorado. 20mm.
As you will notice soon enough, it's quite hard to climb and take pictures at the same time. No I don't mean it literally. If you want to do the hardest routes, you can't afford the burden of a camera. If you want to take well crafted pictures you can't spend most of your time/energy climbing. It's a tradeoff.
One handed operation is very important. Some cameras like the Ricoh can be pulled out of the pouch, turned on, used and tugged safely back inside only with the right hand. Same, if a little harder with the F100. So it's a good point for checking out a camera in a Mom&Pop store instead of ordering it on Internet. For instance the Fujifilm Silvi F2.8 has one trigger button on each side, indeed a rare camera for left handed people.
For rock climbing, get a locking belaying device. It will allow you to take pictures while belaying (well, kind of...). Just don't let your partner see you ! If you have a small P&S camera, keep it in your breast pocket (or some other pocket that won't get crushed if you fall off).
While belaying, attach the camera to a shoulder sling with a biner, let it hang away from rock and belaying device. Remove the lens cap. pre-focus it and set it to some Program mode while your partner is not moving (or not looking); this way you can grab it and take a shot in less than a second when she is in the heat of action. Also if it was your lead, try to organize the belay so as to facilitate photography: make your tie-in line just the right length so you can look over the ledge safely (that's why I prefer to tie in with a clove hitch instead of an often too short daisy chain).
Right: Where's the bottom, where's the top ? Example of lost perspective at Golden, Colorado.
Some advanced cameras (like the MF-21 databack for the Nikon F801s) allow you to do tricks like very long exposure (good for night pictures with star rotations, picture 1 above), automatic multiple exposures (picture 3 above) or long-delay self-portraits if you want to take pictures of yourself while you are quite far (picture 2 above).
I like to keep track of the date and time a picture was taken, but I hate to see it on the pictures. For film, a solution is the databack for the Nikon F4/F5 which prints it between the frames (but inconvenient on slides since it disappears under the mount). Better is a cable+software to retrieve them like HarTalk, but you still have to sort things out. The best solution so far is some Contax which leave the first two slides blank and then, on rewind, write all the film information on them so you can just keep all the slides together. Obviously this is not an issue on digital cameras as all the info is embedded within the Exif field and sometimes even in the filename.
For long exposure, you need a tripod (if there's no wind) or a plastic bag filled with rice/dirt. Take a bunch of shots below f3.5 from 1 minute to 20 minutes if the full moon is up or 10 minutes to 3 hours if it's pitch black. For star rotation pictures, you need a sky as black as possible (no moon, no city lights nearby); and don't walk around the camera with a headlamp while it's taking the shot unless you know exactly what you are doing. I recommend purchasing a used manual camera like the Nikon FM on ebay (~50$): remove the battery, add a cable release and you are set for exposures as long as you want (use low sensitivity film). This beats digital.
It's very hard to take good rock climbing pictures if it's just you and your partner on a route because you are either right below or right above him/her. The best times to take pictures are on traverses.
So a corolary of the previous statement is that you should be more than two climbers. Either one party of 3: one to climb, one to belay and one to take pictures; or two parties. That's how pro photographers do it: they climb or rappel the route in advance and wait in a good spot for the party of 'models'. And another pro trick is to use two long poles (up to 5 meters) to move away from the rock while on rappel; this way you can be in the back of the climber.
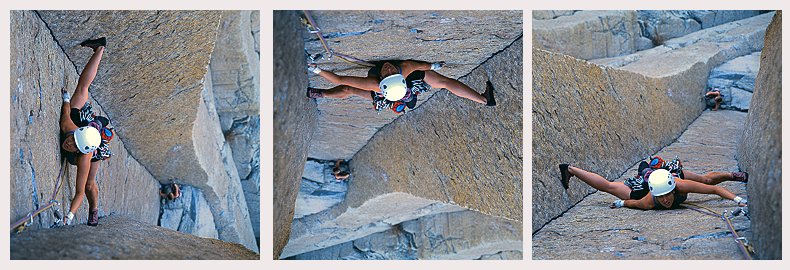
Above: Possibilities of orientation while holding the camera vertical: crack climbing, hard overhang or resting on the ground ! Yes, it's the same picture of Jenny on Devil's Tower El Matador.
![[GoldenStem.jpg]
Brad stemming a vertical perspective. Golden, Colorado. 20mm.](../Climbing/Colorado/GoldenStem.jpg)
Right: Brad stemming a vertical perspective. Golden, Colorado. 20mm.
A note about perspective: one normally holds the camera in a straight manner, either horizontally or vertically, but it's not illegal to cheat by tilting the camera a bit in order to make things appear steeper. But make sure that there is no horizon line in the frame and also that hanging things like ropes, quickdraws, hair or even trees won't give you away... Beware of clouds in particular. Be careful when you do it and don't overdo it: if the cheat is visible, the picture will end up in the garbage.
Also if you hold the axis of the camera vertically (either shooting towards the ground or the sky), the usual rules of perspective don't apply anymore and you can decide to put the sky/cliff/model anywhere, even after the picture has been shot: just rotate the picture to a more dramatic position.
Above: Examples from Devil's Tower El Matador holding the camera pointing vertically with 3 different rotations. The overall impression is quite different although they all seem like proper pictures: just crawling on the ground, crack climbing or insane overhang. Yes, it's the same picture. Also on the right are two pictures taken with a wide angle pointing up, you see how the vertical lines merge in the middle.
![[LostArrow.jpg]
Climber on top of the Lost Arrow, Yosemite. I had to tell him before I traversed that I wanted to take some shots of him standing on the summit. 20mm lens.](../Climbing/Yosemite/LostArrow.jpg)
Be creative ! One of the best training ground for creative climbing photography is bouldering. Nothing looks more similar to a boulder than another boulder, and it's not easy to render in an impressive way someone who still has his butt barely off the ground... So use the whole nine yard: super wide angle, extreme close ups, flash, pics from above or right between the legs, slow motions, second curtain, multiple exposures, expressions (distorted faces), details (crimping fingers, crying eyes, cringing teeth...), light effects (shadow canceled by reflectors, sunlight diffused through chalk cloud...), repetitive falls shown in sequence, important surroundings (worried spotters), body movements (think dance), trash... The advantage of bouldering photography is that you can take with you as much gear as you want (reflectors and flashes come to mind).
Forget about taking pictures fom the ground: you don't see the climber's face and she's gonna be too far, for instance top-rope climbing hardly ever gives results worth keeping. Of course there are exceptions. As I stated before, the best angles are on traverses but also diagonally from above.
Look at magazines. In their competition against one another climbing magazines are very creative in their choice of photography (if only they would compete on the editorial content as well...). Get inspiration by analyzing how they were done or even imitate, it doesn't matter if the original was on a 5.14 and yours is on a 5.7.
Left: Climber on top of the Lost Arrow, Yosemite. I had to tell him before I traversed that I wanted to take some shots of him standing on the summit. 20mm lens.
It may not be photography of top models, but pay attention to what they look like: if they are mostly undressed, enhance the muscles by playing on the direction of the light, if they are dressed make sure it's colorful, and if they are climbing bums make sure their sweat-drenched ripped-off shirts show all the food-stains of the last two months. And if you are thinking about publications, remember that you need to have a written permission from the models (even for your website). Several times I've had people ask me to remove a picture of them I'd taken from a distance and didn't bother to ask for authorization. It happens.
Still about 'models', pay attention to details, in particular the helmet always hides half of the head and casts a dark shadow over the eyes, hiding them in the dark. Ask your partner to remove his/her helmet, just the time to take a shot or two; and don't drop rocks in the meanwhile ! Actually it's a general problem of rock-climbing: the climber faces the rock and never has light on his face, so the face is always hard to see. The only remedy is using a powerful flash to light up the shadows. It's quite impractical to carry up routes, but think about it if you do only a top-rope and have it sent to you somehow. Or ask your model/partner to turn her/his head towards the light.
![[20071016_184238_MtAiguillePano_.jpg]
A tiny spec of a hiker gives a sense of scale to the ridge of the Vercors and Mt Aiguille.](../Climbing/Vercors/20071016_184238_MtAiguillePano_.jpg)
If you have good looking people around, try to get them to climb something for the picture. If you have a good looking rock, try to get someone to climb it for the picture. A classical example is a protruding spire (pic on left) taken from another spire, you need to ask another party to climb it while you take pictures, and not only that, you sometimes need to ask them to take poses ("lay back from the wall", "stand on top", "now do a handstand"), promise them prints as an incentive ! It's hard to yell orders from a distance at someone who's busy doing knots or getting pumped on the crux.
Illustrate. Some of the best climbing shots aren't from actual climbs; they are of climbers joking, gearing up, topping out in the sunset, tossing ropes, camping or whatever.
Right: A tiny spec of a hiker gives a sense of scale to the ridge of the Vercors and Mt Aiguille.
Even if all you care about is the mountain, introducing humans somewhere in the image will give a sense of scale to what otherwise may just be a pile of rocks. That is, unless it's Tomo Cesen on the 4km high South Face of Lhotse taken from kms away, in which case it won't even fill a pixel on the image...
"Free soloing can be deadly, even if it looks great in the photos." — From a Climbing editorial.
A few cameras offer gadgets that can be useful for the solo climber taking a pic of his own scared face while hanging by the other hand. For instance the Fujifilm Silvi F2.8 has couple things that make life easier when taking pictures of yourself:
Hold your camera horizontal ! [except if you want to fake the steepness, see above]. It sounds like totally obvious and stupid advice, but when you are on a slope without too many reference points it's not so easy to do. As a reference use the horizon line if you can see any of it, or the underside of clouds, or the vertical lines shown by trees... Now that I do panoramas and I need to connect pictures to each others, the horizontality becomes crucial and I've noticed I always tilt my camera about 1° to the left if I don't pay attention. I purchased a gridded focusing screen (for Nikon, the reference is 'E type') and it helps a lot. Some digital cameras can display optional grid lines in the viewfinder or on the LCD screen; use that very good option.
Long hair is a major pain when taking shots on windy days. It shows up on a lot of pictures. Shave it or glue it (that's what I'd do if only Jenny would let me) !
When taking pics with a small P&S and wearing gloves, be careful not to put your gloves in front of the camera... Sounds silly, but you have no idea how many pics I've seen with a big red blob on a side, especially on vertical shots.
When it's cold and windless, try not to breath too hard while focusing, even if out of breath: ice deposit can fog the lens, or more often the eyepiece, and then you have to wait for it to clear up. Never attempt to clean a lens with a dirty glove !
Careful when switching lenses on a wall, make sure you have all the movements planned in advance, and also make sure that even if you loose balance (from a tug on the rope for instance) you won't drop everything. Just think about your 1000$ lens bouncing down the cliff and you'll be able to grip the lens just as much as the crimpers on the lead that got you to the belay anyway.
Take the pictures yourself. Yes, the stupidest tip of all, but oh so true. If you want a picture with someone in it, don't ask Billy-Bob Passerby to take it of you. He'll take a shitty shot even if you prepare all the settings beforehand. Ask him to pose instead. Even with 7 missing teeth the result is likely to be better this way. Too bad you won't be on it but you can't be both photographer and model (and neither can Billy-Bob)...
Don't forget to take pictures when you are in trouble. A typical slide shows go something like this: "...and then we had to bivy and it was tough and we barely survived and we were rescued after a week and all but I'm sorry I was too cold/hungry/tired to take pictures". The part that will interest both climbers and non climbers the most is never documented. For instance I don't have any pictures of the mexicans who offered me shelter after my solo ascent of Huascaran and I regret it, as well as many others situations that are now fading from memory. Disclaimer: I'm not saying to take pictures when danger is looming instead of running for shelter; what I mean is that most people take pictures only when conditions are ideal; and when they are tired, hungry, thirsty, cold, late, in their sleeping bag or such, they forget all about photography. Keep in mind that in those cases the quality of the picture is secondary, it becomes reporting instead of art. When I came back from Dumont d'Urville, the windiest place on Earth, I noticed that I had only _one_ picture taken during a bout of katabatic wind. One, over an entire year when half the time the winds were above 150km/h... and I came back with only pics of sunny days that made Antarctica look like an easygoing ski resort.
Get out of your sleeping bag. Yeah, it's nice and cozy, and you are tired, but some of the best pictures are taken at night: star rotations if there's no moon, moonlight over mountaintops otherwise. You need a tripod (even tiny) and a camera that can do B or T pause.
"Move back! Move back!" Be careful when you say that in the mountains, it's exactly how Catherine Destivelle broke a leg in Antarctica: she took a step backward to fit in the frame and fell off the summit ! Ensued a heinous self-rescue... Be careful up there, don't take risks just to take a picture: my friend Fabio fell 26 meters when he tried to take a picture over the rim of a cliff. Don't worry, he was okay (after 6 months in the hospital), just a little bit uglier than before. He even managed to take a lead fall on a multipitch climb and loosen a few screws the very day he was finally released from the hospital...
![[ThunderStrike.jpg]
Lightning strike picture in front of our condo, Colorado. 20mm. Put the camera on a tripod with a cable release in T-pause. Close to a fair amount (say f/16 or more) Determine the maximum exposure from the meter (say 1 minutes) and never go above less than half of that (you want the sky to be dark). Start the exposure and release it as soon as either a lightning occurs or you reach the maximum time. A large angle lens and a lot of film are necessary. If you want to try during daylight storms, you will need a neutral density filter to increase the exposure time. It's much cheaper to use a digital camera for that.](640/ThunderStrike.jpg)
Right: Lightning strike picture in front of our condo, Colorado. 20mm. Put the camera on a tripod with a cable release in T-pause. Close to a fair amount (say f/16 or more) Determine the maximum exposure from the meter (say 1 minutes) and never go above less than half of that (you want the sky to be dark). Start the exposure and release it as soon as either a lightning occurs or you reach the maximum time. A large angle lens and a lot of film are necessary. If you want to try during daylight storms, you will need a neutral density filter to increase the exposure time. It's much cheaper to use a digital camera for that.
So, after all this text, what are the best equipment setups for climbing photography ? It depends on how light you wanna be...
So, if there can be only one climbing camera, I'll choose... the Panasonic LX3 in 2009.
You get better at climbing by climbing. You get better at photography by taking pictures as often as possible. Make your own conclusion for climbing photography. And I'm sure you could take plenty of excellent pictures by doing the exact opposite of all the advice I gave here.
I also believe that if the climb is hard, high and scary the pictures will be interesting, particularly if there is a good story wrapped around !
For some great climbing pictures on the Web, look at: Tuan's photography page and Galen Rowell's pro pictures. RIP Galen, I'd never met you but I'll miss your great pictures.
