"Photography is a reality so subtle that it becomes more real than reality." — Alfred Stieglitz.
First impressions
I've never heard of the S1. The S2 and S3 were peculiar and clunky cameras producing good images and I though long and good about getting an S3. The S4 was never even produced for superstitious reasons... So here comes the S5 from my favorite film manufacturer. Its full name is a mouthful: the 'Fujifilm Finepix S5 Pro digital single lens reflex camera', although no film is involved anymore.
So why should you consider the S5 among the huge choice of other reflex cameras ? It's 40% more expensive than the Nikon D200 on which its hardware is based while having 40% less resolution... The whole difference can be summed up in the dynamic range of its imaging sensor which is 4 times wider. After using the Ricoh GRd for over a year, I came to the conclusion that the dynamic range of normal CCD sensors pretty much suck for outdoor photography: the contrast of the scene is simply often too high. One workaround is to use software HDR from multiple shots, a tedious technique. Or to purchase the Fuji ! Of course, after 2 decades of film photography some adaptation is required.
The good
The body is very similar to my old F100, most buttons are in the same places with the same names, so not much retraining is necessary.
Some accessories can be reused from my F100, such as the MC-30 remote cable (saves 1% on the total bill, hah!).
The screen is readable at any angle (but it's not very high resolution).
The camera properly handle local and reference (home) time.
Linux/cygwin 'exif' can extract info from RAF files. Unfortunately 'jhead' cannot (useful for auto-renames).
In A or M mode, it's possible to use the aperture ring of the lens instead of the 'index finger wheel' (I hate that) ! The function is hidden in [Setup][Button Assignment][Command Dials][Aperture Setting][Ring]
RAF files can have thumbnails view in Windows Explorer, although I'm not sure that it's coming from the FinePix software; I think it's actually coming from the Adobe RAW module for PS/Lightroom.
Some people say the camera is slow (compared to a D200)... who cares except for the sport photographer who takes more shots per second that a video camera (how do they sort through all their garbage anyway ?). It's certainly not slow on the trigger which is what matters most, and the buffer is big enough that you can take a few (8 RAW or 20 JPEG) shots in quick succession without having to wait.
The buffer is quite large and can handle 8 RAW files at 2 images/s before choking and committing them to the card at about 4s/image. When using JPG images this is hardly an issue (something like 20 images in large+fine can fit in the buffer).
Preliminary tests of severely overexposed images (+2 stops), lead to normal images after processing of the RAF file. Also very contrasted images (such as a person on snow) have full information.
In particular I wanted to see how the S5 fares with highly contrasted scenes such as snow or altitude skies, and so far I've always been able to get full details in the light areas, an impressive feat compared to my usual Ricoh.
When using camera equipment I always read the user's manual in full before turning it on, but with the S5 I felt there was no need as the camera buttons are the same as usual and the digital menus are OK to navigate, even containing help screens. I must have read no more than 3 or 4 pages in the first week of use, but as always a thorough read some time later provided insight into many advanced functions. The english manual is well written.
Auto D-Range and Auto-Iso can be useful in real-life shooting, provided you don't forget you have them on, something difficult as they blink the whole time in the viewfinder.
There exists a special infrared and ultraviolet version of the S5 pro called the Fujifilm IS pro (not to be mistaken with the IS-1), available in select stores (mainly B&H). The difference is that there's no filter on the sensor and there's some extra firmware in the camera. And it costs an extra grand... I'd love to have a toy like that, but there's a customary filter for when you take normal shots.
I find the face detection to be a gimmick, but maybe I'll get used to it, if only I can remember to press the [Face] button after a shot to ensure that Jenny is sharp. Group photographers love it (the face detection, not Jenny), although it works only on a no more than 2 or 3 faces. If you really want to use it on large group shots, that's another wait for an hypothetical firmware upgrade.
The camera detects the inclination and sets the frames to portrait or landscape accordingly. Although it fails if the camera is pointing down, which is often the case for my climbing photography. There's no vertical trigger button on the side of the camera like with some high-range Nikons, unless you purchase the additional Nikon or Targus grip.
The [Funct] button, below the preview button, can be set to many different and useful things... but only one at the time.
The [Auto White Balance] is excellent and also work in difficult flash situations. I simply couldn't do better by manually tweaking the WB in a RAW file post-processor.
Apparently Fuji has been surprised by how well the S5 is selling and in the first months stocks have been reduced to zilch, unless pre-ordered. That's a good news in itself, unless you happen to be one of the people waiting for your order.
The not so good, the bad and the things I couldn't figure out
Time setting doesn't seem to have 24 hours, only the dreaded am/pm. [Minor issue as the exif does have full 24h]
During playback, a vertical image will stay on half the screen, even if you zoom it [pretty stupid IMO, let's hope a firmware upgrade will fix that].
The eyepiece does not cover 100% of the image. Particularly annoying for street photography: place the camera against the wall, carefully align the wall out the side of the image, shoot... and you are left with a thin line on the side. On a film camera it was a normal thing to do as the side of the film would be hidden under the plastic frame of the slide or cut out during print anyway. But on digital cameras where the entire image is always used, I find this difficult to accept.
On the preview screen, the zoom doesn't go to the full pixel resolution. This is annoying as you cannot use it to check on the focus or pixel sharpness. It is particularly strange that you can zoom to 100% in the quick display right after you take the image, but as soon as you are in playback mode, you cannot go to more than 6x for large JPEG and 4x for RAW files, which is ridiculous. I find this to be one of the main drawbacks of the camera. [Firmware upgrade please ?].
The user interface is clunky (how many buttons do you have to press if you want to delete a bunch of images ? That's 3 per image). Better start memorizing menus. In particular I find the playback menus to be a real mess; even after a month of use I still press buttons at random to activate functions in it. The panning/zooming toggle is infuriating.
Pressing the [back] button from a submenu just closes all the menus instead of going back to the previous one ! Good luck finding your way back. That's totally counterintuitive.
Why two separate menu buttons with different menus in them ? You get used to the fact that one is for the image settings while the other is for general camera settings, but they overlap a lot.
Do we really need 16 ISO settings (125 iso, 160 iso...) ? OK, makes sense with 1/3 increments in the exposure buttons.
The thumb and index wheels are not precise. No matter how fast you turn them they'll just walk you through one setting at the time slowly as molasses, which entirely defeats the purpose of using a wheel. And the wheels are very hard too. The Ricoh is much better with its clickable and fast wheel.
Some options (for instance ISO) can be set from a menu or from a button (much faster). Why not bring up the menu when the button is used, and leave it on for a few secs in case related options need to be changed as well ? OK, it saves some battery to do it this way.
When using AdobeRGB, the exif info contains 'unknown' and is not recognized properly by several programs I've tried (I'm looking at you Paint Shop Pro), although PS and other Adobe apps have no problem.
No interval mode ? There's a multiple exposure mode, so why not an interval which is a lot more useful on a digital camera (you can always stack up the shots to create a better controlled multiple exposure) ? Come on, I've seen 120$ digital compacts with this mode ! I guess the answer is because they want to sell you the HS-V3 software or the MC-36 Multi-Function Remote Cord...
Can't take pics while using the live display ?!? What is the point then ? Something escapes me entirely here.
The screen brightness adjustment is NOT. All it does is brighten or darken the image being displayed, it doesn't change the LCD itself. Bad, bad, bad and useless. To push it to the max instantly, just press the arrows wheel in its center (kind of hard to do) while the screen is on.
And while we are on the subject of the screen, it's neither very high definition not sharp. Vertical lines appear jagged at the pixel level and text is painful to read. So forget about having a proper idea of the sharpness of the image from it. You cannot adjust the size of the font so you have to scroll and scroll to reach some menus (only 5 lines are displayed, compared to 40 on my cell phone which has a smaller screen).
Some menu functions are reached by scrolling up/down, others by shifting submenu left/right, others by doing both, so there are actually some fairly hidden options. For instance it takes at best 13 clicks to change the aperture ring settings.
I couldn't figure out how to see the files as a remote drive when connecting the camera via USB on WinXP. I have my own scripts I'd like to use, instead I have to use one of many programs to 'copy and convert' the files. No thanks, please give me a standard Mass Storage USB mode in addition to the 3 modes already present (2 of which are useless without the HS-V3 software).
When using RAW+JPG, I get duplicate RAF (same name, same size, same content), but no JPG visible in the virtual drive, that's probably a bug on the Windows driver as both files are present on the card.
Some info seems to be missing (or at least hidden in the proprietary tags) from RAF exif tags, such as D-Range, B&W...
Some info seems to be missing completely from JPG exif tags, such as D-Range, B&W... Or maybe it's there in the proprietary tags but FinePix Viewer won't display exif info and FinePix Studio only works with RAF files. Looks like we are out of luck.
Some programs (such as IrfanView) can read RAF files, but barf if the HDR is more than 100% (not too surprising).
Hyper Utility is too expensive and should be provided with the camera. We are not talking Photoshop here, but basic interaction with the files created by the camera which are basically useless without it. You cannot even remote control the camera without it.
There should be an option to create direct HDR files in addition to JPG and RAF. Not really important as post-processing is more reliable (unfortunately I know of no way to create a direct HDR files from a 130+% RAF file either).
Exposure doesn't seem very reliable with some lenses. More below.
Exposure in low-light conditions seem to constantly underexpose the subject, which is a shame since the camera is very apt at taking over-exposed images.
While we are on this subject, since using 400% dynamic range results in a lower contrast, there should be also some optional tone mapping algorithm to increase local contrasts. It is rather easy to do in post processing, but it would still be good to have it directly on camera menus, even though the 'realistic' aspect of the image would be lost as those tone-mapped HDR images can tend to become cartoonish. The S5 makes the wise (?) choice of always producing faithful images. Still an extra option wouldn't hurt (and we are already lost in the mass of menus anyway).
There's no bluetooth or wifi functions which could be used to transfer GPS data to the camera or images from the camera to a laptop. You can connect a barcode reader, a GPS or an arbitrary serial device to the 10-pin port, but you need to chain a serial cable to yet another expensive Nikon serial cables to do that.
It's worth noting that with so many options you should sit down with the camera for a good hour and work through all the menu options at least once to figure out what the most arcane ones do. And repeat a month later.
The sensor is not even half the traditional film size: 23x15.5mm, aka APS size, leading to a diagonal focal ratio of 1.56 and a side ratio of 1.48:1, although the processing grinds this to a precise 3:2 ratio for non-interpolated images (3024x2016 or 2304x1536). Now it gets a bit complicated: there are 12.3M detectors on the sensor leading to a direct 6.1M pixels image or a 12M pixels interpolated image. It's just that half of those pixels are not used for resolution as you'd expect but to increase the dynamic range; in other words the maximum amount of light that the sensor (and hence the camera) can handle before reaching saturation. The large size of the base detectors ensure a good signal to noise ratio while the small size of the secondary sensors ensure an excellent ability to withstand overexposure or high contrast scenes. By excellent, I mean no less than 4 times better than the best the competition can offer. If you complain about burned out white clouds, snow or flash reflections, the S5 is for you.
Focal equivalency table:
A traditional focal of
20mm
24mm
28mm
35mm
50mm
70mm
105mm
200mm
400mm
1250mm
Becomes equivalent to this when mounted on the S5
30
36
42
52.5
75
105
157.5
300
600
1875
...or must be replaced by this for the same angle
13
16
19
23
33
47
70
133
266
833
Available file modes (you can optionally save JPEG files together with RAW files). Note that there are other quality and resolution available if you use HS-V3 to convert from raw files:
Dimensions
4256x2848
3024x2016
2304x1536
Large
Raw
Medium
Small
High quality version
JPEG L+Fine
Raw D-Range 130~400%
JPEG M+Fine
JPEG S+Fine
Normal quality version
JPEG L+Normal
Raw D-Range 100%
JPEG M+Normal
JPEG S+Normal
MPix
12MPix
6MPix
6MPix
3.5MPix
D200
S5
Since the S5 is based on the body of the D200, they invariably end up being compared:
Purchase price
X
The D200 is cheaper by about 30%
Resolution
X
10 true megapixels for the D200, 12 interpolated from 12 'other' million for the S5
Speed
X
The D200 has a bigger buffer and smaller RAW files leading to more images per seconds in most cases.
Colors
X
More faithful colors for the S5
Custom modes
X
You can have pre-programmed modes on the D200 and shift between them quickly
High contrast
X
Hands down for the high dynamic range of the S5
Noise and low light
X
Noise is better to much better on the S5 at all ISO sensitivities
Flash
X
Better control of bright reflexion on the S5, yet again due to the high dynamic range
Usability
X
Well, the S5 menus are not the most well organized...
Updates
?
Nikon releases a new model about every year just to make you feel frustrated from your now outdated purchase ! C;-)
"If the D200 gave me anywhere near the color output of the s5, I would've kept the one I bought..." — Itinerant (on the S5 flickr discussion list).
Make sure to stay up to date with the latest Firmware upgrade from Fuji, hopefully it will correct some of the issues I raised above. The latest versions of the FinePix Viewer and the camera driver are available off Fuji's website as well. And there's a flickr discussion group dedicated to the S5 where you can find the latest gossip, gripes, flame wars and stupendous shots.
Flash photography
There are 4 possibilities of flash use: the built-in flash (guide number given as 13, probably somewhat less), one of the recommended external flashes (SB-800, SB-600 or SB-R200) mounted on the accessory shoe for full features, a standard flash on the accessory shoe with various levels of functionality or a studio flash via a PC-sync cable.
I didn't purchase the camera for its internal flash. I hardly ever noticed it was there in the first weeks of use, not firing it once, and knowing full well the usual problems associated with this kind of tiny flash: red-eyes, short range, hard light, shadows cast by large lenses and, I thought, limited capabilities. But then upon reading the camera manual in full, I discovered two important things: the internal flash can be used to control remote flashes through Nikon Advanced Wireless Lighting, and it offers complete manual control. Deep in the menu options you can set the flash in i-TTL, TTL, wireless, high-speed sync, manual, compensation, strobe... In other words it's good to know that you have a real and full-featured flash handy, even if its power is quite limited.
Right: Two example of flash photography with a SB-800 mounted on the S5. First image is in evening light, i-TTL with rear-curtain; nice mixup of ambient and flash light. 2nd image (MouseOver) is in complete darkness, front curtain and TTL to avoid pre-flash; it's a usual exposure trap but there's no burnt area, particularly where the flash reflects directly on the skin (nosetip and cheeks). Most settings set to default (Auto-WB, P mode, Auto-Iso, Auto-D-Range...). That's the Fulachier family.
The camera has an AF-assist illuminator which works independently from the flash; but only if your AF-mode is set to [S]ingle. I want it to work even in [C]ontinuous mode since I always use that focusing mode in association with the thumb AF-ON button with a disabled shutter focus. And why not also in [M]anual focus when pressing AF-ON so you can verify your focus ?
If you use a standard flash, that is to say anything except the very latest and most expensive Nikon SB-800/600, don't expect much. Even the recent SB-80DX which works on the first generation of Nikon DSLR won't offer many features: no TTL, no auto-zoom, hell, even no ISO transmission ! Back to the happy days of Auto-flash, like in the 70s. Well, maybe you can use it as a remote in SU-4 mode, provided you also have a SB-800 to act as master on the camera.
The high dynamic range of the S5 finds one more use here. Flashes are infamous for producing bright reflections, often saturating sensors into large all-white patches. The higher dynamic range ensures the overall contrast stays within usable range and it works very well indeed.
First example of remote flash photography on the S5: using the SU-4 remote mode. Camera setup: nothing particular. Mounted flash: SB-800, remote mode set to SU-4, exposure mode set to AA (with an 'S' looking arrow next to it). First remote: SB-80DX, Remote Sel ON, Mode A, remember to orient the side IR window towards the camera (or rather, towards the master flash); no other settings available nor necessary. Second remote: SB-24 mounted on SU-4; set the SB-24 to ON (not stdy), TTL mode, front curtain, no other settings (ISO, Aperture...) necessary; set the SU-4 itself to Auto. Main drawbacks of this method: yu cannot use TTL (unlike on a F100), not very reliable, you need a master on the camera (the internal flash cannot control a SU-4), the remotes must be in sight of the master which is hard to do if you don't want them in the frame, you cannot fine-tune the exposure by specific flash, you cannot use flash preview, the remotes will trigger with any visible flash. Main advantage: works with older flashes.
Second example of remote flash photography on the S5: using the Advanced Wireless Lighting (abbreviated as CLS, go figure): camera with the internal flash activated, [Setup][Flash/BKT][Builtin flash][Commander Mode] where you set TTL/TTL/TTL and a channel number. Remote flash: SB-800 set on remote, set the same channel number and choose a group. Pros: You can put many remote flashes, divide them in several groups with different compensation settings or exposure modes for each, you also have a choice of using TTL mode, it's more reliable than above (although the lone of sight problem still exist). Cons: you cannot use your old flashes, so you need to invest yet again.
There's more info about flash photography with the S5 pro in my much shorter review of the SB-800.
Raw Software
Let me state this clearly: I got the S5 so I wouldn't spend more time tweaking images on the computer than taking them. The idea is to have a camera that delivers the goods, and not a pile of expensive software to work around shortcomings. Understandably, some software is still necessary to go from the camera to the final print, but the workflow is somewhat lighter.
One thing comes out of all I've written above: the S5 produces excellent JPG files out of the box and gets even better tweaking the options. But then, what about going one step further an process the RAW files ? Let's see now what is possible.
Now onto a different subject, it's been said that the S5 produces HDR images, but this is not quite true. Although the sensor has a high dynamic range, the image files it produces are classic. An HDR file should contain luminance information as expressed in intensity values and represented by open scale floating point number (12.6 is twice as bright as 6.3 and so on). Such images are usually produced by software, either in ray-tracing or by combining shots taken at various exposures, and as such cannot be displayed properly on current monitor or print technology (where 0 is black and 255 is white and those values are boundaries which don't exist in the real world). The S5 does indeed take the equivalent of two differently exposed shots at once thanks to its advanced sensor, but the data is combined internally to produce a standard JPG file, or a RAW file that can only be processed properly by Fuji software into a standard JPG or TIF file. So although the theoretical answer is yes, the practical one is no. But maybe a firmware upgrade or an update to FinePix Studio or Hyper Utility will one day allow direct HDR conversion, who knows. Or more likely there'll be a new version of Photomatix or another tone mapping program that can combine both sensor readings into a single HDR file; as for doing tone mapping from those two sets of sensors, forget it for now as there's no way to extract them separately that I know of. Please let me know if you know a way.
Test images
Click on the buttons below to see various test images taken with various options and lenses.
Image options
ISO sensitivity
(Zoom)
Comment
Grain second to none up to 800 iso. Contrast increases slightly with sensitivity. (All image parameters set to standard)
Processing
Comment
This is an overview of the camera possibilities, between the default settings (dubbed 'STD' in the menus), the 'real' RAW file with all options off (Color, Tone, Sharpness and Noise) usually called 'ORG' in the menus, and the same options set to the max (called High or Hard depending on the option).
Dynamic range
Comment
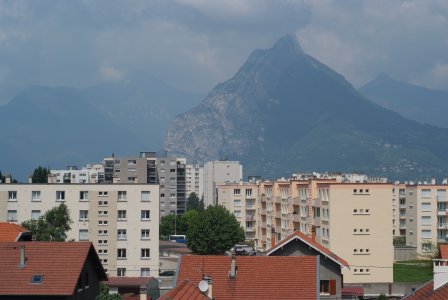
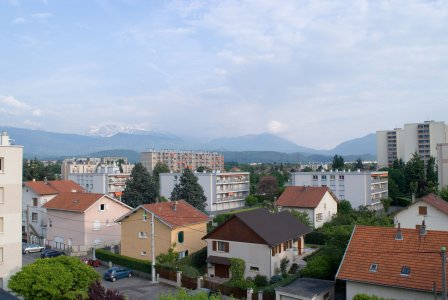
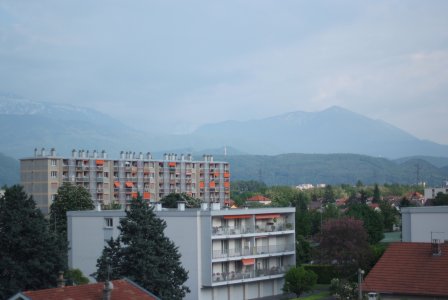
The camera can be used in standard mode (100%), HDR modes (130 to 400%) or with simulated film types (not shown here). For instance F1 is a low contrast suitable for portrait (similar to Sensia is my guess) while F2 is high saturation (similar to Velvia). 100% correspond to the use of only the main photosites and thus leads to standard images. Any percentage above that (up to 400%) leads to HDR images created from a double input, so you get an extended dynamic range at the expense of a lower visual contrast (think about it). High contrast scenes can fit on the sensor instead of being clipped. This is where the S5 truly shines (see below the overexposure tests). Because of the drop in contrast I find that using 130% is a good choice (after all you didn't pay all those extra photosites for nothing), or more realistically the [Auto] option on the camera.
Limits
(Zoom)
Comment
Two series of two shots: with a dynamic range of 100% (Std) or 400% (W2), and overexposed by 3 stops or underexposed by one. Logically there is no difference when underexposing the image. But the overexposed image is 70% burnt at 100% while still fairly usable at 400% (with some additional post processing).
Color saturation
(Zoom)
Comment
There are 5 levels of color saturation (which is obviously separate from the sRGB/AdobeRGB colorspace choice) in addition to B&W. Even when set to high, the image doesn't fall into the ridiculous excess of other brands. If you like overly saturated images, you'll have to post process with PS as the camera or the Fuji software is resolutely geared towards faithful colors.
Tone (=contrast)
Comment
The camera has 5 tone settings, but the FinePix software offers full manual curve adjustment. Combine this with the high dynamic range and your have excellent fine-tuning capabilities with little risk of clipping the highlights.
Sharpness
Comment
Big difference on the zoom, choose as you like.
Noise removal
Comment
The noise removal includes the removal of dead or hot pixels. Its use is also unsuitable for astrophoto, otherwise stars which happen to look just like hot pixels end up being removed from the frame ! Overall I find the background texture better without noise removal. Note that for astrophoto, there's also a mirror lockup (2 shutter pressures before trigger) and a 0.4s trigger delay available as options. See below.
Dynamic range test
Those shots are taken with a 50mm/f1.8 lens in P mode.
STD 100%
Auto 100%
HDR 400%
Auto 400%
Comment
Two series of 5 images were taken: one set with 100% dynamic range, the other with 400%. In each set the images were underexposed to -5 and -2 EV, and overexposed to +2 and +5EV (that's a lot). Images were saved as raw (RAF) and then processed with Photoshop RAW module, either 'camera default' or 'auto'. There's not much difference between 100% and 400% for underexposed images, but the difference is huge for overexposed images: just compare the +5 shots after auto processing. It's easy to tell why the Fuji SuperCCD sensor wins hands down: even an image overexposed 32 times (that's 5EV) is still recoverable (even if the shade of the sky is way too purple); 100% is similar to what you get with other sensor brands. Note that RAF files for 130~400% files are twice as big since the data of the small photosites is saved as well.
In fact, I love the images rendered by the S5 so much that my GRd started looking bleak at once. So I looked at Fuji's compact camera lineup. They are all advertised as 'SuperCCD'. But beware: there's the SuperCCD SR, mounted on the S2, S3 and S5, and the HR, mounted on everything else. The SR technology with the double photosites implies that they be large, so if you have an itty bitty sensor (like in most compact where they are typically 5x9mm), the resolution would be insufficient. Hence the HR (High Resolution) denomination. But then you loose the great advantage of the Dynamic Range. In the days of film they could fit a 24x36mm 'sensor' in a camera half the size of a fist (including canister and winding area and motors), and now they claim they can't make one with even an APS-sized sensor. What a load of bullshit.
Real-life (?) example
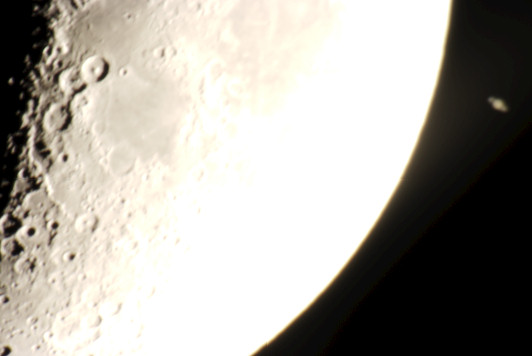
Here's a more useful example of image where the S5 pro really shines: astrophotography. Images taken with a Celestron Nexstar 5i (1250mm).
An image of a conjunction between Saturn and the moon taken with 100% dynamic range. In other words, this is the kind of image that could be taken from any digital SLR.
Now the same image with maximum dynamic range (400%). It may no seem obvious but there's a huge difference: on this image there's virtually no overexposed pixel.
To press the point, here's the first image with all the purely white or black pixels shown as red or blue. In this case we don't care about underexposure as the night sky is really supposed to be black. Notice that half the moon is 'burnt' ?
In contrast, the high dynamic version of the image fits within our histogram, save for a few pixels...
...meaning that it can be post-processed successfully into something even more interesting such as this image (local contrasts are enhanced as well as an unsharpen mask applied). With an average SLR you would need to take two images at different exposures and combine them.
The Fuji S5 pro seems to be a very good astrophotography camera due to a combination of factors:
you can disable the noise reduction function (otherwise stars tend to be mistaken for hot pixels and be removed by the image processing)
the camera has very low noise even at high ISO sensitivity (3200 is a bit too much IMO)
an auto-mirror lockup function is available to dampen vibrations, although I waits only 0.4 seconds. This is accessed from the [Setup][Shooting][Exposure Delay Mode] menu.
the mirror up is a better function, one click to raise the mirror, and another one to shoot. This function is accessed from the [Mode] dial on the top left of the camera, after [S], [CL], [CH] and [Timer].
the screen preview can be used to fine-tune the focus, although I find it very strange that you can't shoot while it's on.
the auto-exposure works without lens (or mounted on a T-ring) unlike the D70...
the high dynamic range ensures that the brighter stars won't burn the field around them.
The main drawback when mounted on a scope is that the camera is heavy, so you'd better tighten some screws and have a counterweight ready.
Lens tests
Note that only one of my lenses is optimized for small digital sensors (DG reference with Sigma). More info about those lenses here.
Nikkor 50mm/f1.8 AF
Comment: This is a reference lens, high definition all around.
Sigma 24-70mm/f2.8 AFD EX DG
Comment: at 24mm and also at full aperture the lens is pretty soft. When you combine both, you get abysmal performance... That's too bad as this is my only lens 'optimized' for digital cameras. Indeed that's so bad that I'm beginning to wonder if I got the focus right. Only 70mm stopped down performs well, but images are underexposed (why?)
Sigma 28-70mm/f2.8 AFD EX
Comment: Soft at full aperture, but not as bad as above.
Nikkor 20mm/f2.8 AFD
Comment: Excellent as soon as you leave 2.8, and not too bad there.
Sigma 28-105mm/f2.8-4 AFD
Comment: I wonder why the image is underexposed at 28mm...
Sigma 70-200mm/f2.8 EX APO HSM AFD
Comment: Only 70mm is a bit soft at full aperture, all other zoom settings being excellent. 400mm is obtained with the Sigma 2.0X APO Tele Converter which is soft in the angles (not a problem on a small sensor) but also suffers a hefty amount of vignetting (visible even here !).
Sigma 35-70mm/f3.5-4.5 AF Anaglyphic
Comment: Anaglyphic effect is maximum at full aperture, so a trade off with the weak sharpness must be accepted.
Sigma 8mm/f4 Fisheye
Comment: Unfortunately the sensor covers the whole 180° frame only horizontally, that is not to say that the lens becomes useless, for instance to build 180x360 spherical panoramas.
Exposure tests
One of the first things I noticed upon using the S5 is that the exposure on some images is dead wrong. To be more specific, I can shoot a sequence of similar shots and there will be a huge ±2EV variation ! Operator inexperience ? Poor AE sensor ? Wrong setting somewhere ? Firmware bug ? Some other people have reported this issue while others have spot-on exposure. My luck if I got a lemon... Let's see if I can get to the depth of this.
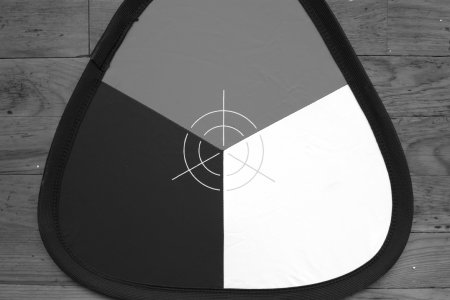
On this test I use a grey chart with 2 sides. Both sides have a grey 18% area. One one side there's also a grey -0.5EV and +0.5EV, while the other side has black and white areas (I don't know how many EVs of difference that is supposed to be). So I took 6 shots by doing a spot exposure on the middle of each area and reframing the shot to the center. I rotated the chart so that the measured area would always be on top. And I took 2 series of shots at the widest and narrowest zoom position, this for two lenses. Images are taken in B&W mode to avoid white balance issues.
24-70/2.8 at 24mm
24-70/2.8 at 70mm
18-50/2.8 at 18mm
18-50/2.8 at 50mm
Comment: First on the Sigma 28-70mm/f2.8, the greyness of the top part of the image should be the same on all shots (since the exposure is done on it): it's not. Then notice that the 'gray' (from the 3 grey side) and 'grey' (from the white+black side) area should be absolutely identical and they are not. Also notice that while the exposure at 24mm is globally OK, at 70mm it is too dark on all but one shot.
Now let's look at the Sigma 18-50mm/f2.8: the exposure is perfectly stable almost everywhere (111 at 18mm and 123 at 70mm, a little lighter). At 18mm the blacks are a little overexposed and the whites a little underexposed.
So my guess is that there are problems with some lenses. Maybe the characteristics of some lenses, in particular 3rd party lenses like Sigma or older non DG lenses, have not been inserted inside the internal exposure database, who knows. Just to prove that if you want to be sure the S5 exposes correctly, you'd better check it out yourself. It also joins the fact that some people have been complaining about the exposure while others have reported no problem: it probably depends on what glass you have mounted. Note that since this test is only in spot, it shows nothing of the possible 'intelligence' of the other exposure modes.
Now onto a different problem: when taking shots in low-light conditions, the camera consistently under-exposes the image. This applies for instance when taking indoor portraits in ambient light at high sensitivity. I've found out that using a +1ev compensation brings out a lot more details and since the sensor handles perfectly even a solid overexposure, there's not much harm in doing this. You have to be a bit more careful when doing this when using the flash (you might want to then do -1ev on the flash itself). But this is more a matter of personal preference.
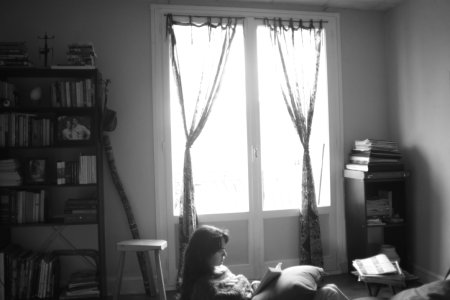
OK, let's do another test as maybe the exposure changes too much depending on border effects (although a grey card should avoid that). Here I take 3 shots, exposing by pointing the camera outdoors, on the left wall or on the picture frame among the books on the left. I take 3 series of shots, in spot, matrix metering and center-weighted. Note that if the lens if G or D, it uses 3D color matrix metering as opposed to simple Matrix metering.
Spot
Center-weighted
Matrix
Comment: Spot exposure is correct. Center-weighter seems to behave as if to expose on the brightest thing found near the center of the images (explaining why the wall image is so dark as there's a piece of outside in it). As for the Matrix, I don't know what to think: the outdoors shot is a little lighter that spot as expected; the wall shot is way off, meaning that if you have something bright covering 1/3 on the right of the frame, it will expose for it (don't expect good backlit images). Even the 'picture frame' shot is wrong, as when metering for it I had only a tiny bit of the window on the far right of the images. Conclusion: the camera is able to handle great overexposure thanks to its dynamic range, but they've set the meter to always expose on the highlights, which kinds of defeats the purpose... It is possible (in some sub-sub-menu) to customize the exposure to a certain amount of compensation for each specific mode (spot/center/matrix), but something more intelligent would be required.
Suggested settings and workflows
Custom settings
Here's a quick list of some of the settings I've changed my camera:
Shooting/Image Comment/Type In
Remember to enter your name and/or web address in the image comment so that if your images end up on the other side of the world (which is likely with the web), they'll know where they come from.
Shooting/Shooting speed
2FPS, might as well make the best of it.
Display/Grid Display
ON, so that you can take horizontal landscapes.
AF/AF activation
A:AF-ON ONLY
AF/AF lock-on
OFF (otherwise the autofocus is dead slow to react).
Exposure/AE lock
A:AE-L ONLY (this way autofocus is performed with the thumb while the index finger is used only for shooting, focused or not).
Exposure/Iso auto control
ON, up to 800 ISO and down to 1/30s. This is my guilty pleasure when shooting in changing light (think indoor near windows) as it may not be very professional but with the very low noise level of the S5, why risk it ?
Flash/Built-in flash
TTL so as to avoid most of the dreaded pre-flashes
Button assignment/AE-L/AF-L button
AE LOCK HOLD so you can shoot sequences at the same exposure, for instance for panoramas. The only drawback of this setting is that the AF-assist illuminator doesn't light up when using a flash.
Button Assignment/Func button
FV LOCK (flash value lock).
Button Assignment/Command Dials/Aperture Setting
Ring, that is if you have older (better!) lenses with an aperture ring.
System/Frame No
CONT just to make sure you won't ever overwrite an image.
Quickest
Set the camera to Auto D-Range, Auto-WB, STD in all modes, auto ISO control (that's through the [Setup][Exposure][Iso Auto Control] menu, why is it missing from the ISO menu or wheel ?!?), Large+Fine JPEG... Once transfered to the PC, rename the files and use them directly.
Stylish
Unlike some result modes of other cameras (such as Sepia) which produce very specific images, the film simulation modes of the S5 produces usable images looking like, d'oh, film photography. So for instance the F2 film simulation looks like slide film with good saturation but some clipping of the bright lights that can be dealt with better by the standard mode. The F1 modes are close to color negatives and thus better for different types of portrait (flash, smooth, outdoors...)
RAW Power
Same settings as above, D-Range set to 130% to 400% (not 100%), RAF file output (directly settable through the [Qual] button + wheel). Also set the Auto-bracketing to +2F 1EV and the shooting mode to CL. Use the [A]perture priority mode with the aperture ring setting (see above). I discussed RAW processing software above, my current conclusions is to use HSV3 for ease of use and quality of the results. Or Adobe Lightroom if you have the time to master its stack of options and quircks and you plan on learning the RAW import options for Photoshop anyway. Or, as I've found out, the excellent SilkyPix. Now let's see possible S5 RAW workflows, starting two different ways and continuing with three alternative RAF processing options:
⇒ [optional post-processing in PSP or Photoshop, you may loose the Exif info] ⇒
YYYYMMDD_PlaceOrEventName/YYYYMMDD_HHMMSS_Something.tif, this is your reference work image
⇒ [JPG conversion script] ⇒ YYYYMMDD_PlaceOrEventName/YYYYMMDD_HHMMSS_Something.jpg, this is your distribution image
⇒ [downsampling and sRGB conversion script] ⇒ wwwroot/.../YYYYMMDD_HHMMSS_Something.jpg, for web publishing
Scripts
Here is a script I use as part of my workflow. It is an extension of the script I originally wrote for the Ricoh and works on any digital camera or memory card. It moves the files from the camera/card, renames them by date and moves them to dated directories. It works on RAF/RAW/RW2/DNG raw files, JPG/TIF images, sound files, videos and a few other specific files. You need Cygwin installed on Windows but it works directly on Linux. Read the comments in the file.
I've been a loyal Fuji customer ever since I first tried Velvia. And Provia. And Sensia. And Reala. And I think I'll stick with them with their new Super CCD as it's the first time I see a sensor that gives me what I expect. And the camera around it is good old healthy Nikon hardware which I've been using since I first touched a camera. The few cons are fairly minor and most may even be solved by a future firmware upgrade, hopefully. Now if only I could afford to replace my whole range of lenses...
Fast forward a few months, August 2007, and Nikon coming out with the D3. I first feel a pang of regret: with its 24x36 sensor, this is the camera I've been waiting for for 10 years. Then when I look at the specs more closely one thing stands out: you cannot use your old 24x36 lenses without strong vignetting. And a few other details like a min ISO of 200 which is a drag if you want wide aperture portraits outdoors. So forget it, I'm happy with the S5 and will stop leering at the neighbors' teenage daughter. At least for a while.
Real images
After all this dry talk and ugly test images, what about some real images from the S5 ? Here are some S5 images:
 MC-30 remote cable (saves 1% on the total bill, hah!).
![[20070612_200126_SoulaParty.jpg]
Two example of flash photography with a SB-800 mounted on the S5. First image is in evening light, i-TTL with rear-curtain; nice mixup of ambient and flash light. 2nd image (MouseOver) is in complete darkness, front curtain and TTL to avoid pre-flash; it's a usual exposure trap but there's no burnt area, particularly where the flash reflects directly on the skin (nosetip and cheeks). Most settings set to default (Auto-WB, P mode, Auto-Iso, Auto-D-Range...). That's the Fulachier family.](FujiS5pro/20070612_200126_SoulaParty.jpg)
![[20070520_103836_LesAyesJenny.jpg]
Jenny climbing at Les Ayes, above Briancon.](../Climbing/Briancon/20070520_103836_LesAyesJenny.jpg)
![[20070518_070111_GlacierNoir.jpg]
Upper part of the Glacier Noir. Notice the very high contrast of this image, but details are still visible all over.](../Climbing/Briancon/20070518_070111_GlacierNoir.jpg)

