 PhotoshopPSP
Text and pictures © 2006-2026 Guillaume Dargaud
Last updated on 2025/10/27
"The photographer who combines scientific method with artistic skill is in the best possible position to do the good work." — Ferdinand Hurter.
On this page I'll discuss how to start from several images and combine them in order to end up with a single, hopefully better, image. Why ? There are several different reasons to want to perform image combinations: either to create an image which you cannot directly take with your photographic equipment (such as a widefield panorama) or to create a better image than what the equipment allows (for instance a higher dynamic range). The two main problems with combining images are the alignment of the images (so that lines and curves stay regular) and the blending (so that colors don't show sudden changes). Special software is used to perform those feats.
As usual with photography, and particularly panoramic photography, a tripod is a very worthy addition in every instance. Images taken from a stable tripod by rotating the camera around its nodal point will need no or little deformation to match properly during the alignment phase. On the other hand, I've found that recent software is getting so good that it can handle handheld images with little or no additional effort: images are deformed to match properly and work fine if you have held the camera properly.
Every single one of the methods I describe below require a proper alignment procedure. For this purpose I use PTgui, a program meant for panorama assembly, but which can also align a stack of images. You just create a series of intermediate 'aligned images' before proceeding with the next process (HDR, focus extension...)
| Software | Photoshop |
PSP |
Photomatix | PTgui | RotAndStack |
|---|---|---|---|---|---|
| Can perform alignment | No, or limited to stacking layer and moving them manually to minimize the difference | Yes, but performs very poorly | Yes, use the [Save individual layers] without blending option. Also needs playing with the optimizer options. | Limited to rotated field | |
| Can perform HDR | Yes, but results are not that great | Yes since version X2. Untested. | Yes | The blending option in the [Save individual layers] actually merges the colors without taking into account the burned/black areas | Limited to binning and averaging |
| Panorama creation | No | Yes, full solution | Not recommended | ||
| Sequences | Manually in stacked layers | No | For intermediate alignment only | ||
| Tourist removal | |||||
| OS | Mac, Windows | Windows | Windows | Mac, Windows | Windows |
| Price | ~$600 | ~$80 | $100, or free version for only 2 images | 65 | Free |
I've written at length about panorama images assembly in other pages of my site, so I won't do it again here. Just to say that the techniques involved have gotten greatly easier and with much better results since the time of scissors and scotch-tape. Even though I wrote my own panorama program 10 years ago, I currently use PTgui for many different uses: either to create full panoramas, or as an intermediate image alignment program.
![[20060627_BikeTrailPano_.jpg]
Combining panoramic and sequencing techniques for this unglamorous image of pushing a bike on a too rocky trail.](../Climbing/Briancon/20060627_BikeTrailPano_.jpg)
Right: Combining panoramic and sequencing techniques for this unglamorous image of pushing a bike on a too rocky trail.
Creating a full fledged panorama from a set of digital images can be as simple as loading them in the program, pressing [Generate control points] and then [Create Panorama]. Just a few minutes for a basic image, up to several hours for a precise positioning, exposure blending and crop to standard dimensions. The program is nicely optimized to not use too many resources, even when creating 100 megapixel images, it's hardly noticeable while running in the background. Note that you need a little hack if you want to use fisheye images as a source.
Starting with PTgui is very quick, but the many options are staggering if you want to go any farther. First learn the difference between the projection types: rectilinear (for enhanced resolution images, see below), cylindrical (for standard panoramas) or spherical (for 360x180° panoramas). Then check the control points for each pair of images with overlapping areas, add as many as necessary in important areas such as the horizon. Then play with the optimizer, in particular the extra [Hor shift d] and [Vert shift e] options which I often need when the outer parts of images won't connect properly. Then make sure the panorama is horizontal and has the horizon in the proper place; in particular if the images were taken with the camera tilted up or down, you should force the horizon in the middle of the window, even if that leaves a lot of unused black (you'll crop that later). For this see the manual for click and keyboard shortcuts while in the [panorama editor] window. Also download the separate addons Enblend and Smartblend wich can perform better on some kind of problematic transitions. Finally if you have difficult images where parts (=people) have moved during the shooting, don't hesitate to save unblended layers and clone brush the problematic parts in Totoshop.
You have a great scenery in front of you and would just love to take a very high resolution image such as those taken by large chamber cameras, but you have only a tiny 35-110 zoom camera ? Use the same technique than for panoramas, the only difference being that you zoom in. Take a row of central images, take a row on top, take a row below, whatever it takes. Same 'nodal point rotation' rule applies, as well as paying attention to the exposure. Best result are obtained with 60% overlap between adjacent images so that even non-adjacent images do overlap; this facilitates the blending process.
Say if you take 9 images at 70mm with about 50% overlap with an 8 mega-pixel camera, after assembly you end up with about 30 megapixels as taken with a 35mm camera. Not bad compared to the price and weight of a large format camera, heh ? And there's no practical limit with this, some guys on the net have played with taking hundreds of telezoom images and combining them into giga-pixels images. Can come in handy if you want a wall-size image at home with pixel level precision. This is probably the technique they use to create pictures in movies, you know, where the detective zooms 30 times into a 10x15cm print and says: "OMG, the killer is reflected in the spoon on the table of the other room..."
![[EcrinsTop_Pano_.jpg]
A panorama of the summit of the Barre des Ecrins, a 4102m summit in the southern Alps. Combination of 9 images taken with a 200mm telephoto lens. The resulting image has a whooping 100 megapixels.](Combine/EcrinsTop_Pano_.jpg)
Obviously this technique is only applicable to static images: landscape without too much wind (passing clouds can go fast), studio stills... Even night shots are difficult using this method as stars will rotate between the shots.
Right: A panorama of the summit of the Barre des Ecrins, a 4102m summit in the southern Alps. Combination of 9 images taken with a 200mm telephoto lens. The resulting image has a whooping 100 megapixels. 
I have grouped a bunch of very high resolution images here.
The most simple way to take a time lapse movie: put the camera on a tripod, program it to take images at regular intervals (some digital cameras have this option, others require a control computer and a USB connection), and assemble the resulting images with a video editing program (I use... Matlab !). Keep the exposure on [auto] as lighting conditions may change during extended shooting time. Note that if you operate from a digital camera, you'll probably want to downsample the images before you feed them to a video app. Here's a very simple example I made at Dome C, using a 10$ webcam out the window and a free program called Dorgem.
One neat trick when doing time lapse videos is to use a wide angle camera, and then cut a part in each image, moving slightly the cut window on each image, to give a panning impression on the resulting video. You can also reduce the crop window to give the impression of a zoom-in. This is better done with a few simple scripts in ImageMagick. This way you can simulate a moving field of view such as seen in the reference movie Koyaanisqatsi. Note that if you own a motorized telescope, it's also a good way to use it as a slow moving camera holder.
![[SuperCrackJasonSequence.jpg]
Sequence showing a sequence of a climber on Supercrack, at Utah's Indian Creek.](../Climbing/Utah/SuperCrackJasonSequence.jpg)
![[BaseSeqC.jpg]
This sequence of base jumping in the Verdon could have benefited from some dynamic range extension as well as the sky is pretty much burned](BaseJump/BaseSeqC.jpg)
For photographing a sequence, same usual treatment: camera on a tripod, or missing that, align the images with adequate software (PTgui) and then work on the resulting individual unblended layers. Use a reference image as the background, empty and properly exposed, and then add each of the other images as a new layer, deleting everything not being the part you want to keep (in the cases of the examples shown here: the climber, the jumper or the sun). The process is simple with some practice. You can combine panorama and sequence techniques by following the point of interest when shooting instead of letting it go through a static frame.
Right: This sequence of base jumping in the Verdon could have benefited from some dynamic range extension as well as the sky is pretty much burned
Left: Sequence showing a sequence of a climber on Supercrack, at Utah's Indian Creek.
![[20060714-Fireworks.jpg]
Combined image of fireworks above the old city center of Briançon, 14 July 2006. As you can see on the work images, I didn't even bother aligning the images. Quite the opposite, I selected pieces I liked off various images and stacked them with Photoshop in the places I liked, removing the parts I did not want. A process made easy here by the dark background. The layer stacking is performed mostly using the 'Lighten' or 'Overlay' options so you don't even have to worry about the background being cut improperly. I took a special background image with a longer exposure time so I could have a clean background.](Combine/20060714-Fireworks.jpg)
Right: Combined image of fireworks above the old city center of Briançon, 14 July 2006. As you can see on the work images, I didn't even bother aligning the images. Quite the opposite, I selected pieces I liked off various images and stacked them with Photoshop in the places I liked, removing the parts I did not want. A process made easy here by the dark background. The layer stacking is performed mostly using the 'Lighten' or 'Overlay' options so you don't even have to worry about the background being cut improperly. I took a special background image with a longer exposure time so I could have a clean background.
![[SunRun_800.jpg]
The trajectory of the sun above Concordia over a 24 hour period. This image combines sequence taking (one image every hour), with panoramic techniques (the camera is rotated 15 degrees every hour to keep the sun in the vertical center).](../Antarctica/DC2005/Pano/SunRun_800.jpg)
Right: The trajectory of the sun above Concordia over a 24 hour period. This image combines sequence taking (one image every hour), with panoramic techniques (the camera is rotated 15 degrees every hour to keep the sun in the vertical center).
Sequence pictures like those shown above follow a 'target' across a background, selecting several 'targets' to multiply them across the background. The opposite effect can be used to remove people from an image. You want a picture of Time Square without all the crowds ? Either wait until 4am to take a single shot (and take the risk of trying to kick that last sleeping drunk away), or take several images hoping that people will move enough in the meanwhile, and select the parts of the images that don't feature anyone.
Another simple way to do this is to use a high density neutral grey filter and perform a very long exposure, blurring people away into nothingness in the process, just like in the olden days of very low sensitivity emulsions (19th century).
I haven't actually found a software that does it simply, but it would actually be pretty easy to write a single piece of software to perform either sequence selection or 'tourist' removal. Maybe when I have some extra time...
![[RodriguezCombined.jpg]
Drilling a Rodriguez Well on the high polar plateau, a simple way to get water. The high contrast of the scene made it impossible to take a single correct image, so I took one exposing for the person, and another one exposing for the snow. The final image is straightened with some contrast enhancement filters applied.](Combine/RodriguezCombined.jpg)
Ever noticed completely dark areas or completely white ('burned') areas on pictures ? This is because the limits of the film or sensor have been reached: if too much light comes onto the film or sensor, it just saturates it and all information is lost ('burned'). Inversely if not enough photons hit the film or sensor, no information is registered and it stays hopelessly dark. The first way out of this is a correct exposure: if the image shows burned out areas, then it probably should have been exposed a little less, but plenty of things can induce the light-meter in error. When in doubt, bracket it out. Meaning take several images, one darker, on lighter and then choose the best one.
Right: Drilling a Rodriguez Well on the high polar plateau, a simple way to get water. The high contrast of the scene made it impossible to take a single correct image, so I took one exposing for the person, and another one exposing for the snow. The final image is straightened with some contrast enhancement filters applied.
But then, if you have both burned out and completely dark areas, bracketing won't help. The scene you are trying to capture has just too much contrast, as often happens with backlit images for instance. For a long time the only way out has been to use partial neutral filters, which is a solution which works great if you have for instance a clear sky over a dark land, the darker half of the filters blocks out part of the light coming from the sky, equilibrating the ranges from upper and lower part of the image. This works great as it also usually gives natural-looking results.
Another way out is called HDR: high dynamic range images. It's a way to combine several different exposures of the same scene in a way to discard lost information (too dark or too light), filling the gaps with what's available on some of the images, while keeping the properly exposed areas in between. Another way too look at it is that the HDR scale is open ended, just like light in real life, and the software tries to rebuilt the real amount of light from information found on several differently exposed images.
Obviously this process lowers the overall contrast of each individual image turning the HDR image itself into something intermediate which cannot be displayed directly. Another conversion into a 'standard image' is necessary after the HDR step and there are different and arbitrary ways to do it. There's also the problem of junction: what's dark grey in an underexposed image can in reality be lighter than what's light grey in an overexposed image. What do you do when those two areas are next to each other ? The decision is hard to make and this is very difficult to do manually, that's why I recommend a program like Photomatix which does this very efficiently: just load the images, select one of the [Combine][H&S detail] functions and save the resulting image as TIF 16 bits. The program converts to HDR and then converts to a 'standard image' for saving.
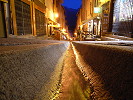
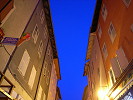
![[20060621_0012325_StreetChurch_Overlap.jpg]
The Collegiale church in old town Briançon. High contrast as well as artificial lighting on this image.](Combine/20060621_0012325_StreetChurch_Overlap.jpg)
There are actually several ways to combine images in a way to increase visibility in dark or light areas. If you want both of them, HDR is a way. If you just want more visibility in the dark areas, a well used process in astophotography is called 'binning'. The basic idea is to just select the lightest pixel of a bunch of stacked images. The drawback is that this greatly increases the noise level. I wrote a little program that can do alignment and binning quite simply.
Left: The Collegiale church in old town Briançon. High contrast as well as artificial lighting on this image.
Logically, when you combine several images to increase the dynamic range, you increase the number of colors in the resulting image, so it's logical to save using a file format which can handle more colors than the original. Saving as 16-bit TIFF (aka 48-bits TIF) is a good idea, at least until you can finalize your image. For fine tuning, and since HDR images often lack visual contrast, I often load the resulting HDR with the original images together and stack them up as layers. Then creative erasing of parts of the original images, and liberal use of the [Overlay] option with partial opacity for layers can bring out more contrast and saturation.
How to do HDR and panoramic combination at the same time ? Take a first series of images as for a normal panorama. Then take a second one under- or over-exposed, as required. Import all the images into PTgui and check the control point junctions not only between adjacent panoramic shots, but also between the lighter/darker shots. You can produce a first panorama with all the images as a reference, but then it's better if you produce one only with the light images and another one with the darker images. Both will be perfectly aligned and ready to load into Photomatix for the final processing step.
More info about HDR ? Here's a discussion about what may be the first monitor able to display HDR images and a flickr HDR discussion group. I have my own gallery of HDR images on a separate page.
There's actually a lot more to high dynamic range than just the combining of images:
![[20060730-Edelweiss4-Combine.jpg]
An Edelweiss mountain flower with La Meije in the background. A first image is taken in macro, a second one on the hyperfocal, both with the camera pointing the same way. Then the lower part of the first image is combined with the upper part of the second one.](Combine/20060730-Edelweiss4-Combine.jpg)
Right: An Edelweiss mountain flower with La Meije in the background. A first image is taken in macro, a second one on the hyperfocal, both with the camera pointing the same way. Then the lower part of the first image is combined with the upper part of the second one.
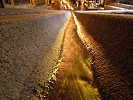
![[20060621_GargouilleE_Pano_.jpg]
Combination of 5 images taken with different focus, while at the same time raising the camera for each shot. This is the main street of the old town of Briançon, water running down in the middle like in medieval cities, also known as 'La Gargouille'.](Combine/20060621_GargouilleE_Pano_.jpg)
One more reason to combine images is due to limits in the laws of optics: the limited depth of field created by a given lens. Say, as in this example, that you want a picture of little flowers with the mountain scenery in the background. Traditional way to do it is to focus on the flowers ad let the background be out of focus. A better way to do it with a reflex camera, is to close the aperture ring, say to f22, press the Depth of Field (DOF) preview button on the camera, manually adjust the focus so the flower is just at the front of the depth of field volume (takes some practice) and take the shot. This may not be good enough if lighting or weather (wind shaking the flower) conditions don't allow for a long enough exposure time.
Another way is to take two images, one focused on the flower, the other one focused on the mountain (or better, on the hyperfocal), and assemble them after alignment. On this first example I didn't even bother performing a proper alignment as the junction area is all grey anyway. On the second example, the focus was changed gradually from a few cm away to infinity as I was slowly raising the camera between each shot.
Much quicker than using a graphic program to stack the images and manual layer adjustments, there's some software dedicated to just that purpose: Helicon Focus or the free Combine ZM. I haven't tried them yet.
Left: Combination of 5 images taken with different focus, while at the same time raising the camera for each shot. This is the main street of the old town of Briançon, water running down in the middle like in medieval cities, also known as 'La Gargouille'.
If you want to read more on the subject, the book Photographic Multishot Techniques: High Dynamic Range, Super-Resolution, Extended Depth of Field, Stitching covers it all.
